Portal 2 Chapter 3 Test Chamber 10: Difference between revisions
Jump to navigation
Jump to search


Moussekateer (talk | contribs) No edit summary |
m (Reverting vandalism) |
||
| (20 intermediate revisions by 14 users not shown) | |||
| Line 2: | Line 2: | ||
{{Test Chamber Infobox | {{Test Chamber Infobox | ||
| title = Chapter 3 | | title = Portal 2 Chapter 3 Test Chamber 10 | ||
| valve-title= Ricochet | |||
| map = sp_a2_ricochet.bsp | | map = sp_a2_ricochet.bsp | ||
| dirty = 1 | |||
| number = 10 | | number = 10 | ||
| total = 22 | | total = 22 | ||
| Line 11: | Line 13: | ||
| icon3 = cube hazard on | | icon3 = cube hazard on | ||
| icon4 = water hazard | | icon4 = water hazard | ||
| icon5 = laser sensor | | icon5 = laser sensor on | ||
| icon6 = laser redirection on | | icon6 = laser redirection on | ||
| icon7 = faith plate on | | icon7 = faith plate on | ||
| Line 21: | Line 23: | ||
}} | }} | ||
== Hazards == | This is the nineteenth level of the game, and is set within a dilapidated Test Chamber. This level requires the player to utilise their knowledge of [[Thermal Discouragement Beam]]s, [[Aerial Faith Plate]]s, [[Discouragement Redirection Cube]]s and momentum in order to complete the test. The Test Chamber also introduces the ability of the Discouragement Beam to affect the position of [[Panels]], and thereby allow access to otherwise unreachable areas. | ||
== Contents == | |||
=== Mechanics === | |||
* [[Discouragement Redirection Cube]] | |||
* [[Weighted Storage Cube]] | |||
* [[Heavy Duty Super-Colliding Super Button]] | |||
* [[Vital Apparatus Vent]] | |||
* [[Aerial Faith Plate]] | |||
* [[Flinging]] | |||
* [[Pedestal Button]] | |||
* Laser Receptacles | |||
* [[Panels]] | |||
* Light Strip (white) | |||
=== Characters === | |||
* [[Chell]] | |||
* [[GLaDOS]] | |||
=== Hazards === | |||
*[[Thermal Discouragement Beam]] | *[[Thermal Discouragement Beam]] | ||
=== Locations === | |||
* ''Aperture Science Enrichment Center'' | |||
* ''Test Chamber 10 (GLaDOS)'' | |||
== Walkthrough == | == Walkthrough == | ||
{{Spoiler|block=yes| | |||
*Shoot a portal at the bottom of the gap between you and the [[Weighted Storage Cube]] on the spinning panel. | |||
*Turn around and fire the other portal on the wall facing the Storage Cube as close to the ceiling as you can. | |||
*Go through the portal in the gap. | |||
*Pick up the Storage Cube and drop down to the bottom of the ledge. | |||
*Go through the portal and use the [[Aerial Faith Plate]]. | |||
*Place the Storage Cube to block the [[Thermal Discouragement Beam]]. | |||
*Drop down and use the Faith Plate again. Shoot a portal at the wall near the [[Switch]]. | |||
*Press the Switch and wait for the [[Discouragement Redirection Cube]] to get all the way up. | |||
*Pick up the Redirection Cube and drop down to the right. | |||
*Take the Storage Cube out of the way and replace it with the Redirection Cube. Aim the Beam for the two panels at the wall on the other side. | |||
*Place a portal at the same wall. | |||
*Take the Storage Cube and drop down. Use the Faith Plate. | |||
*Place the Storage Cube on the [[Heavy Duty Super-Colliding Super Button|button]]. | |||
*Go in the [[Chamberlock]]. | |||
}} | |||
== Video walkthrough == | == Video walkthrough == | ||
{{walkthrough}} | {{walkthrough}} | ||
== Related achievements == | |||
{{Show achievement|Portal 2|Overclocker|width=50%}} | |||
== Music == | |||
{{main|Portal 2 soundtrack}} | |||
{{Track|I Saw a Deer Today}} | |||
== Gallery == | == Gallery == | ||
| Line 38: | Line 88: | ||
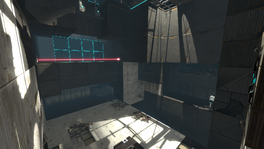
|File:Portal 2 Chapter 3 Test Chamber 10 overview 3.png|alt2=Another view|Another view. | |File:Portal 2 Chapter 3 Test Chamber 10 overview 3.png|alt2=Another view|Another view. | ||
}} | }} | ||
{{TestChambersNav}} | {{TestChambersNav}} | ||
[[Category:Portal_2_chambers]] | |||
Latest revision as of 05:09, 13 June 2023
 | “I can't get over how small you are!” This article is a stub. As such, it is not complete. You can help Portal wiki by expanding it. |
Portal 2 Chapter 3 Test Chamber 10
sp_a2_ricochet.bsp Ricochet

This is the nineteenth level of the game, and is set within a dilapidated Test Chamber. This level requires the player to utilise their knowledge of Thermal Discouragement Beams, Aerial Faith Plates, Discouragement Redirection Cubes and momentum in order to complete the test. The Test Chamber also introduces the ability of the Discouragement Beam to affect the position of Panels, and thereby allow access to otherwise unreachable areas.
Contents
Mechanics
- Discouragement Redirection Cube
- Weighted Storage Cube
- Heavy Duty Super-Colliding Super Button
- Vital Apparatus Vent
- Aerial Faith Plate
- Flinging
- Pedestal Button
- Laser Receptacles
- Panels
- Light Strip (white)
Characters
Hazards
Locations
- Aperture Science Enrichment Center
- Test Chamber 10 (GLaDOS)
Walkthrough
- Shoot a portal at the bottom of the gap between you and the Weighted Storage Cube on the spinning panel.
- Turn around and fire the other portal on the wall facing the Storage Cube as close to the ceiling as you can.
- Go through the portal in the gap.
- Pick up the Storage Cube and drop down to the bottom of the ledge.
- Go through the portal and use the Aerial Faith Plate.
- Place the Storage Cube to block the Thermal Discouragement Beam.
- Drop down and use the Faith Plate again. Shoot a portal at the wall near the Switch.
- Press the Switch and wait for the Discouragement Redirection Cube to get all the way up.
- Pick up the Redirection Cube and drop down to the right.
- Take the Storage Cube out of the way and replace it with the Redirection Cube. Aim the Beam for the two panels at the wall on the other side.
- Place a portal at the same wall.
- Take the Storage Cube and drop down. Use the Faith Plate.
- Place the Storage Cube on the button.
- Go in the Chamberlock.
Video walkthrough
Related achievements
 |
Overclocker Complete Test Chamber 10 in 70 seconds |
Music
Main article: Portal 2 soundtrack
I Saw a Deer Today by Aperture Science Psychoacoustics Laboratory [3:13] | ![]() Download |
Download | ![]() Play
Play
Gallery
|


