Portal 2 Chapter 4 Test Chamber 18
Jump to navigation
Jump to search
 | “I can't get over how small you are!” This article is a stub. As such, it is not complete. You can help Portal wiki by expanding it. |
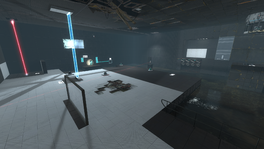
This is the twenty-seventh level of the game and the first part of Chapter 4. It is set within a dilapidated Test Chamber, and requires the player to utilise advanced knowledge of the Hard Light Bridge and Thermal Discouragement Beam in order to proceed. This level features both Goo and Turrets as its main hazards. Wheatley also makes a lengthy appearance at the end of the level.
Contents
Mechanics
- Laser Receptacle
- Discouragement Redirection Cube
- Vital Apparatus Vent
- Hard Light Bridge
- Grating
- Glass
- Light Strip (white, pink)
- Aerial Faith Plate
- Panels
- Pedestal Button
Characters
Objective
- Complete GLaDOS' Test Shaft (Test Chamber 18)
Hazards
Locations
- Aperture Science Enrichment Center
- Test Chamber 18 (GLaDOS)
- Surprise Room
- Nanobot Working Area (in-between chambers 18-19)
Walkthrough
- Proceed to the spotlight in the dark room, where GLaDOS gives you the surprise. Afterwards just walk straight.
- Drop down to the test chamber and stay behind the Hard Light Bridge. Place a portal on the wall on the opposite side and another one below you.
- Once you've entered the portal place a portal at the ceiling where the Bridge ends.
- Place the other portal in the floor on the left, so the Bridge prevents the two Discouragement Redirection cubes from colliding in the air.
- Press the button and make sure that the two cubes do not get destroyed in the goo.
- Place a portal on the wall behind the glass wall and the other one on the wall behind you and enter the portal.
- Place the portal under one of the cubes, so that the cube enters the portal and fall near you. Then repeat.
- Turn to face the Thermal Discouragement Beam and place a portal on a wall near the Beam, so that you can take the two cubes safely near the beam.
- When you have the cubes near the beam, place one of them so the beam goes through two of the receptors.
- Take the other cube and use the beam coming from the first cube to destroy the turret on the other side of the room.
- Place the cube behind second receptor and aim it through the third one and the receptor in the wall to open the door.
- Place a portal in the ceiling in front of the Bridge and go stand near the exit.
- Place the other portal on the wall on the left side and use the bridge to get to the Chamberlock.
Video walkthrough
Music
Main article: Portal 2 soundtrack
I Made It All Up by Aperture Science Psychoacoustics Laboratory [3:56] | ![]() Download |
Download | ![]() Play
Play


