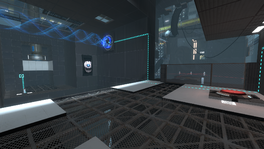
Portal 2 Chapter 8 Test Chamber 16
 | “I can't get over how small you are!” This article is a stub. As such, it is not complete. You can help Portal wiki by expanding it. |
This is the fifty-sixth level of the game, and takes place within an incomplete Aperture Science Test Chamber. This level features both the Excursion Funnel and Repulsion Gel, and demonstrates the way in which the Gel can be used to dispose of some threats. Turrets are present as an additional hazard in this level.
Contents
Mechanics
- Flinging
- Panels
- Vital Apparatus Vent
- Pedestal Button
- Heavy Duty Super-Colliding Super Button
- Repulsion Gel
- Excursion Funnel
- Glass
- Light Strips (blue, white, pink, behind-the-scenes)
Hazards
- Deadly Pits
- Turrets
Characters
Locations
- Test Chamber 16 (Wheatley)
Objective
- Go through Wheatley's Test Track.
Walkthrough
- Shoot portals on the Conversion Gels on both sides and go through the portal.
- Go through the door. Shoot a portal on the wall below the Repulsion Gel.
- Place the other portal on the floor and go through it.
- Fire a portal at the end of the Excursion Funnel above.
- Push the Switch.
- Now the gel should flow in the Funnel. Wait for the timer to stop and then put the other portal on the wall.
- Now place the same portal at the end of the Funnel. Press the Switch and quickly jump from the gel into the Funnel.
- Wait until you've passed the Turrets and then go stand on the button.
- Wait for the gel to pass through the portal as much as it can and then shoot the other portal on the wall on the right - above the Turrets - and leave the button.
- Watch for the gel to go on top of the third Turret and then shoot the same portal on the floor. All three of the Turrets should bounce away.
- Push the Switch on the other side of the glass.
- Now go in the funnel and wait until you reach the ceiling.
- Shoot the other portal on the angled wall and wait until you land on solid ground.
- Go in the Chamberlock.
Video walkthrough
Related achievements
 |
Smash TV Break 11 test chamber monitors |
Music
TEST by Aperture Science Psychoacoustics Laboratory [6:14] | ![]() Download |
Download | ![]() Play
Play
Excursion Funnel by Aperture Science Psychoacoustics Laboratory [4:32] | ![]() Download |
Download | ![]() Play
Play
Transcript
GLaDOS: Alright, he's not even trying to be subtle anymore... ...or maybe he still is, in which case, wow, that's kind of sad.

[DESTRUCTION]

Wheatley: Sorry, sorry, my fault.

Wheatley: Butterfingers.

GLaDOS: Either way, I get the impression he's about to kill us.

Wheatley: Carry on.

Wheatley: Only three more chambers 'til your big surprise. [EVIL LAUGH]

Wheatley: Oh, that's--- that's tiring.

Wheatley: Oh. You solved it? Good. Good one. Good for you.

GLaDOS: So, he's inexplicably happy all of a sudden, even though he should be going out of his mind with test withdrawal. AND he's got a surprise for us. What did he FIND back there?
Trivia
- According to this, it's said that only one world portal is left in the whole game. This one can be found at the end of the level.
- According to this, the destruction sequence before entering the actual chamber was added to remind players that they could get to the repulsion gel pipe without the need for the Excursion Funnel. (The portal placements to cross both gaps, into a floor and out of a wall, are intentionally identical to further this reminder.)
- Before the event was added, playtesters focused too much on the Excursion Funnel and tried to use it to cross the gap.


