“I can't get over how small you are!” This article is a stub . As such, it is not complete. You can help Portal wiki by expanding it .
Test Chamber 17
testchmb_a_13.bsp
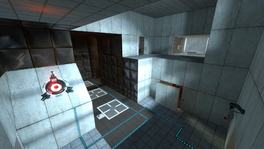
This Test Chamber is the eighteenth level of the game, and introduces the player to the Weighted Companion Cube . The Chamber features multiple High Energy Pellets and is home to the second Rattman den.
Mechanics
Hazards
Walkthrough
Go to the end of the hallway.
Pick up your Companion Cube and place it in front of the small ledge. Jump on the cube and then jump on the ledge.
Pick up the cube and repeat. Take the cube and use it as a shield from the Pellet.
Upon reaching the other side of the hallway, look out for the bouncing Pellet. Wait for the pellet to disappear.
Go in front of the second hallway. Wait for the pellet in that hallway to go away from you.
Run to the other side while using the cube as a shield. Then turn to the left and go through the door.
Drop down from the ledge and go through the doorway facing the three lifts.
Use the cube to bounce the Pellet into the catcher.
Go back and leave the cube on the floor. Fire a portal on the wall above the ledge.
Turn to face the catcher. Place a portal on the angled wallpanels.
Put the other portal on the wall where the Pellet is bouncing off. Wait for the pellet to get into the catcher.
Drop down from the ledge and pick up the cube.
Go in the room with the button. Turn left and place the cube on the button on the ledge opening the second door.
Head back out of the dark room and place a portal on the wall facing the doors and buttons.
With the other portal on the ledge, go through the portal. Go to the other end of the hallway again.
Shoot the portal on the wall where the last pellet is bouncing off and go back to stand next to the button in the dark room (avoid the Pellet).
Wait for the Pellet to go past you and the button towards the door. When it does, go stand on the button and the Pellet should hit the catcher.
Take the Companion cube out of the room and then place a portal above the ledge. Go through the portal with the cube.
Jump on lift with the cube. Continue by jumping on the two other ones. Then turn right and jump down to the lower ledge.
Go along the hallway. Put the cube on the button and go through the door.
Push the switch and get the Companion cube from the button.
Euthanize the Companion Cube by dropping it down in the Emergency Intelligence Incinerator .
Enter the chamberlock behind you.
Alternative Solutions
By stacking the cameras from the Ratman's Den (and the additional cameras that can be detached from the walls) in front of the raised platform, you can reach the platform with the Companion Cube without guiding all the Pellets to the Pellet Catchers.
By using a glitch Portal Bump, one can bump portals behind the glass without guiding all the Pellets to the Pellet Catchers.
Fratricide
Video walkthrough
Download demo file
See Also


