Portal 2 Chapter 2 Test Chamber 6: Difference between revisions
Moussekateer (talk | contribs) No edit summary |
m (Auto: templateRenameMapping (Review RC#198405)) |
||
| (37 intermediate revisions by 19 users not shown) | |||
| Line 1: | Line 1: | ||
{{stub}} | {{stub}} | ||
{{ | {{Chamber infobox | ||
| title = Portal 2 Chapter 2 Test Chamber 6 | |||
| valve-title = Trust Fling | |||
| map = sp_a2_trust_fling.bsp | |||
| dirty = 1 | |||
| number = 06 | |||
| total = 22 | |||
| screenshot = Portal 2 Chapter 2 Test Chamber 06.png | |||
| icon1 = cube dispenser on | |||
| icon2 = cube button on | |||
| icon3 = cube hazard on | |||
| icon4 = player button | |||
| icon5 = water hazard on | |||
| icon6 = fling enter | |||
| icon7 = fling exit | |||
| icon8 = faith plate on | |||
| icon9 = turret hazard | |||
| icon10 = dirty water | |||
| previous = Portal 2 Chapter 2 Test Chamber 5 | |||
| next = Portal 2 Chapter 2 Test Chamber 7 | |||
}} | }} | ||
This is the fifteenth level of the game, and takes place within a dilapidated Test Chamber. This level introduces the player to advanced manoeuvres using [[Aerial Faith Plate]], particularly the way in which the momentum provided by the Faith Plate can be used in conjunction with [[Portals]] in order to allow the player to gain access to areas that would otherwise be beyond reach. {{Spoiler|The Test Chamber also features one of Doug Rattman's [[dens]].}} | |||
== Hazards == | == Contents == | ||
* | |||
=== Mechanics === | |||
* [[Weighted Storage Cube]] | |||
* [[Vital Apparatus Vent]] | |||
* [[Heavy Duty Super-Colliding Super Button]] | |||
* [[Pedestal Button]] | |||
* [[Aerial Faith Plate]] | |||
* [[Flinging]] | |||
* Light Strip (pink, white) | |||
=== Characters === | |||
* [[Chell]] | |||
* [[GLaDOS]] | |||
=== Hazards === | |||
*[[Goo]] | |||
=== Locations === | |||
* ''Aperture Science Enrichment Center'' | |||
* ''Test Chamber 06 (GLaDOS)'' | |||
== Walkthrough == | == Walkthrough == | ||
{{Spoiler|block=yes| | |||
*Walk towards the left of the chamber, then look back to the right to spot two angled portal-conductive surfaces. Place a portal on each platform. | |||
*Walk back to the entrance of the chamber and use the Faith Plate there. | |||
*Once at the destination, press the [[Switch|switch]] to release garbage onto the initial [[Aerial Faith Plate]]. When instructed, press the button again to release a [[Weighted Storage Cube]]. While facing the direction of the switch, note the [[Heavy Duty Super-Colliding Super Button]] to the bottom left. | |||
*When the Cube arrives, place it on the Button by placing a portal above the Button, and then dropping the Cube through the portal. | |||
*The exit door will now open, proceed into the [[Chamberlock]]. | |||
It is also possible to solve the chamber by activating the button with an [[Edgeless Safety Cube]] that GLaDOS drops as part of the garbage pile. But this can only be achieved once and the original solution is more recommended. Additionally, another method of solving the puzzle is to place an exit portal on the far wall to the right of the Heavy Duty Super-Colliding Super Button (the same wall that the entrance door is on), and the cube will land on the button if the portal is placed correctly. This will also grant the "Drop Box" achievement. | |||
}} | |||
== Video walkthrough == | == Video walkthrough == | ||
| Line 31: | Line 62: | ||
== Related achievements == | == Related achievements == | ||
{{Show achievement|Portal 2|Final Transmission|width=50%}} | {{Show achievement|Portal 2|Final Transmission|width=50%}} | ||
{{Show achievement|Portal 2|Drop Box|width=50%}} | |||
{{Show achievement|Portal 2|Pturretdactyl|width=50%}} | |||
== Music == | |||
{{main|Portal 2 soundtrack}} | |||
* {{Track|15 Acres of Broken Glass}} | |||
* {{Track|Ghost of Rattman}} | |||
== Gallery == | == Gallery == | ||
| Line 36: | Line 74: | ||
|width=192 | |width=192 | ||
|height=108 | |height=108 | ||
|lines= | |lines=4 | ||
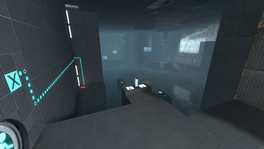
|File:Portal 2 Chapter 2 Test Chamber 6 overview.png|alt1=An overview of the Test Chamber|An overview of the Test Chamber. | |File:Portal 2 Chapter 2 Test Chamber 6 overview.png|alt1=An overview of the Test Chamber|An overview of the Test Chamber. | ||
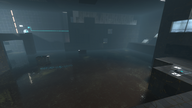
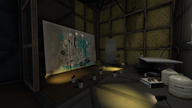
|File:Portal 2 Chapter 2 Test Chamber 6 rat man den.png|alt2=Rat Man den found in the Test Chamber, where [[Hoopy the Hoop]] can be seen|[[Doug Rattmann|Rat Man]] den found in the Test Chamber, where [[Hoopy the Hoop]] can be seen. | |File:Portal 2 Chapter 2 Test Chamber 6 rat man den.png|alt2=Rat Man den found in the Test Chamber, where [[Hoopy the Hoop]] can be seen|{{Spoiler|[[Doug Rattmann|Rat Man]] den found in the Test Chamber, where [[Hoopy the Hoop]] can be seen.}}|spoiler2=yes | ||
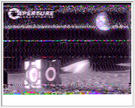
|File:Final transmission SSTV.png|alt3=Image produced in MMSSTV from dinosaur_01.wav, the slow-scan signal played by the Rattmann's radio|Image produced in MMSSTV from dinosaur_01.wav, the slow-scan signal played by the Rattmann's radio.|spoiler2=yes | |||
}} | }} | ||
{{TestChambersNav}} | {{TestChambersNav}} | ||
[[Category:Portal 2 chambers]] | [[Category:Portal 2 chambers]] | ||
Latest revision as of 15:00, 13 June 2024
 | “I can't get over how small you are!” This article is a stub. As such, it is not complete. You can help Portal wiki by expanding it. |
This is the fifteenth level of the game, and takes place within a dilapidated Test Chamber. This level introduces the player to advanced manoeuvres using Aerial Faith Plate, particularly the way in which the momentum provided by the Faith Plate can be used in conjunction with Portals in order to allow the player to gain access to areas that would otherwise be beyond reach. The Test Chamber also features one of Doug Rattman's dens.
Contents
Mechanics
- Weighted Storage Cube
- Vital Apparatus Vent
- Heavy Duty Super-Colliding Super Button
- Pedestal Button
- Aerial Faith Plate
- Flinging
- Light Strip (pink, white)
Characters
Hazards
Locations
- Aperture Science Enrichment Center
- Test Chamber 06 (GLaDOS)
Walkthrough
- Walk towards the left of the chamber, then look back to the right to spot two angled portal-conductive surfaces. Place a portal on each platform.
- Walk back to the entrance of the chamber and use the Faith Plate there.
- Once at the destination, press the switch to release garbage onto the initial Aerial Faith Plate. When instructed, press the button again to release a Weighted Storage Cube. While facing the direction of the switch, note the Heavy Duty Super-Colliding Super Button to the bottom left.
- When the Cube arrives, place it on the Button by placing a portal above the Button, and then dropping the Cube through the portal.
- The exit door will now open, proceed into the Chamberlock.
It is also possible to solve the chamber by activating the button with an Edgeless Safety Cube that GLaDOS drops as part of the garbage pile. But this can only be achieved once and the original solution is more recommended. Additionally, another method of solving the puzzle is to place an exit portal on the far wall to the right of the Heavy Duty Super-Colliding Super Button (the same wall that the entrance door is on), and the cube will land on the button if the portal is placed correctly. This will also grant the "Drop Box" achievement.
Video walkthrough
Related achievements
| Final Transmission Find the hidden signal in one of the Rat Man's dens |
| Drop Box Place a cube on a button without touching the cube |
| Pturretdactyl Use an Aerial Faith Plate to launch a turret |
Music
- 15 Acres of Broken Glass by Aperture Science Psychoacoustics Laboratory [4:59] |
 Download |
  Play
Play - Ghost of Rattman by Aperture Science Psychoacoustics Laboratory [4:06] |
 Download |
  Play
Play
Gallery
|


