This is the fourteenth level of the game, and takes place within a dilapidated Test Chamber. This level continues to use the [[Thermal Discouragement Beam]] as its primary [[mechanic]], and demonstrates the way in which interrupting the Discouragement Beam can be used to the player's advantage. The Test Chamber also introduces the [[Unstationary Scaffold]], and Toxic Water is present as the primary environmental hazard.
This is the thirteenth level of the game, and takes place within a dilapidated Test Chamber. This level continues to use the [[Thermal Discouragement Beam]] as its primary [[mechanic]], and demonstrates the way in which interrupting the Discouragement Beam can be used to the player's advantage. The Test Chamber also introduces the [[Unstationary Scaffold]], and Goo is present as the primary environmental hazard.
== Hazards ==
== Contents ==
* Toxic water
=== Mechanics ===
* [[Weighted Storage Cube]]
* [[Vital Apparatus Vent]]
* [[Heavy Duty Super-Colliding Super Button]]
* Track Platform
* [[Pedestal Button]]
* Laser Receptacles
* [[Panels]]
=== Characters ===
* [[Chell]]
* [[GLaDOS]]
=== Hazards ===
* [[Goo]]
* [[Thermal Discouragement Beam]]
* [[Thermal Discouragement Beam]]
=== Locations ===
* ''Aperture Science Enrichment Center''
* ''Test Chamber 04 (GLaDOS)''
== Walkthrough ==
== Walkthrough ==
Line 42:
Line 64:
|width=192
|width=192
|height=108
|height=108
|lines=1
|lines=2
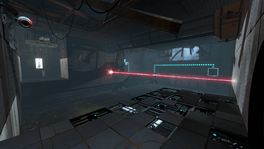
|File:Portal 2 Chapter 2 Test Chamber 4 overview.png|alt1=An overview of the Test Chamber|An overview of the Test Chamber.
|File:Portal 2 TC 04- Beta 01.png| Earliest known version of Test Chamber 4
|File:Portal 2 Chapter 2 Test Chamber 4 overview.png|alt1=An overview of the Test Chamber|An overview of the Test Chamber
}}
}}
{{TestChambersNav}}
{{TestChambersNav}}
[[Category:Portal 2 chambers]]
[[Category:Portal 2 chambers]]
Latest revision as of 13:05, 18 March 2022
“I can't get over how small you are!” This article is a stub. As such, it is not complete. You can help Portal wiki by expanding it.
Portal 2 Chapter 2 Test Chamber 4
sp_a2_laser_over_goo.bspLaser Over Goo
This is the thirteenth level of the game, and takes place within a dilapidated Test Chamber. This level continues to use the Thermal Discouragement Beam as its primary mechanic, and demonstrates the way in which interrupting the Discouragement Beam can be used to the player's advantage. The Test Chamber also introduces the Unstationary Scaffold, and Goo is present as the primary environmental hazard.
Once inside the test chamber, look straight ahead to find a switch against a wall. Place a portal on the wall to the immediate left, and the opposite portal on the wall near the switch.
Place a portal on the wall where the Thermal Discouragement Beam makes contact. Ensure that this portal is opposite to the colour placed on the wall to the left of the chamber entrance. If done correctly, the beam will make contact with the receptacle, and the Unstationary Scaffold will move towards the platform with the button.
Once on the platform, use the cube to block the beam temprarily in order to manouver around it. Once on the other side, pick up the cube once more, and place it on the Heavy Duty Super-Colliding Super Button to open the door to the Chamberlock