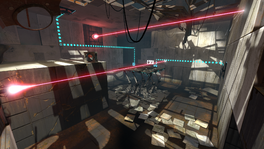
This is the twelfth level of the game, and takes place within a dilapidated Test Chamber. This level introduces the player to multiple [[Thermal Discouragement Beam]]s within a single chamber.
== Contents ==
=== Mechanics ===
* [[Discouragement Redirection Cube]]
* Laser Receptacles
* [[Panels]]
=== Characters ===
* [[Chell]]
* [[GLaDOS]]
* [[Wheatley]]
=== Hazards ===
*[[Thermal Discouragement Beam]]
*[[Thermal Discouragement Beam]]
=== Locations ===
* ''Aperture Science Enrichment Center''
* ''Test Chamber 03 (GLaDOS)''
== Walkthrough ==
== Walkthrough ==
{{Spoiler|block=yes|
*Upon entering the chamber, look up, a [[Discouragement Redirection Cube]] is visible, get to it using portals.
*Grab the cube and jump to the platform in the middle of a chamber. Put the cube on the platform such that it redirects a lower [[Thermal Discouragement Beam]] to the receptacle. Then go back to the original location of the Discouragement Redirection Cube, look up to find another receptacle on the ceiling.
*Place a portal on the wall where the upper Thermal Discouragement Beam makes contact and place another portal under the second receptacle.
*After both beams are redirected to the receptacles the exit doors will open, proceed to the [[Chamberlock]].
}}
== Video walkthrough ==
{{walkthrough}}
== Video walkthrough ==
== Music ==
<!--{{youtube||width=640}}-->
{{main|Portal 2 soundtrack}}
1. '''''Exile Vilify''''' - 4:46 by [http://www.americanmary.com/ The National]
{{youtube|QGo8b_frsac|audio=yes}}
== Bugs ==
* If you activate one of the Thermal Discouragement Beam receptacles, then deactivate it and activate the other one (both with portals), [[GLaDOS]] will congratulate you the way she would if you finished the test normally, despite the test wasn't actually completed, as in, you can't go through the [[Chamberlock]].
== Easter Eggs ==
* You can see one of Rat Man's Dens in this chamber. To the right of the exit you can see a broken wall leading to his den. Two of his trademark murals are painted on the walls and there is a radio tucked away in a corner – it’s the only place in the game you’ll hear a song written and composed specifically for Portal 2, The National’s “Exile Vilify.” The lyrics are incorporated into the murals.
== Trivia ==
* There is [[Wheatley]] hidden in this chamber, right under the panels that lift to give you access to one of the lasers. He appears only for a brief moment though.
|File:Test Chamber 3 Beta 1.png|Pre-release Test Chamber 3 with closed Rat Man den
|File:Test Chamber 3 Beta 2.png|Pre-release Test Chamber 3 with a Rat Man den opening on the right wall
|File:Portal 2 Chapter 2 Test Chamber 3 Rat Man den.png|alt1=A Rat Man den|{{Spoiler|A [[Doug Rattmann|Rat Man]] den.}}|spoiler1=yes
|File:Portal 2 Chapter 2 Test Chamber 3 Rat Man den radio.png|alt2=Radio playing Exile Vilify found in the den|{{Spoiler|Radio playing [[Portal 2 soundtrack|Exile Vilify]] found in the den.}}|spoiler2=yes
|File:Chapter 2 chamber 3 wheatley.png|alt3=Wheatley hiding under the panels|{{Spoiler|[[Wheatley]] hiding under the [[panels]].}}|spoiler3=yes
}}
{{TestChambersNav}}
[[Category:Portal 2 chambers]]
Latest revision as of 17:40, 16 March 2022
“I can't get over how small you are!” This article is a stub. As such, it is not complete. You can help Portal wiki by expanding it.
Portal 2 Chapter 2 Test Chamber 3
sp_a2_dual_lasers.bspDual Lasers
This is the twelfth level of the game, and takes place within a dilapidated Test Chamber. This level introduces the player to multiple Thermal Discouragement Beams within a single chamber.
Grab the cube and jump to the platform in the middle of a chamber. Put the cube on the platform such that it redirects a lower Thermal Discouragement Beam to the receptacle. Then go back to the original location of the Discouragement Redirection Cube, look up to find another receptacle on the ceiling.
Place a portal on the wall where the upper Thermal Discouragement Beam makes contact and place another portal under the second receptacle.
After both beams are redirected to the receptacles the exit doors will open, proceed to the Chamberlock.
If you activate one of the Thermal Discouragement Beam receptacles, then deactivate it and activate the other one (both with portals), GLaDOS will congratulate you the way she would if you finished the test normally, despite the test wasn't actually completed, as in, you can't go through the Chamberlock.
Easter Eggs
You can see one of Rat Man's Dens in this chamber. To the right of the exit you can see a broken wall leading to his den. Two of his trademark murals are painted on the walls and there is a radio tucked away in a corner – it’s the only place in the game you’ll hear a song written and composed specifically for Portal 2, The National’s “Exile Vilify.” The lyrics are incorporated into the murals.
Trivia
There is Wheatley hidden in this chamber, right under the panels that lift to give you access to one of the lasers. He appears only for a brief moment though.
Gallery
Pre-release screenshot
Pre-release Test Chamber 3 with closed Rat Man den
Pre-release Test Chamber 3 with a Rat Man den opening on the right wall