| screenshot = User Moussekateer Portal 2 Act 2 Test Chamber 02.png
| screenshot = Portal 2 Chapter 2 Test Chamber 02.png
| icon1-on = true
| icon1 = cube dispenser on
| icon2-on = true
| icon2 = cube button on
| icon3-on = true
| icon3 = cube hazard on
| icon4-on = true
| icon4 = player button
| icon5-on = true
| icon5 = water hazard
| previous = Portal 2 Chapter 2 Test Chamber 01
| icon6 = laser sensor on
| next = Portal 2 Chapter 2 Test Chamber 03
| icon7 = laser redirection on
| icon8 = turret hazard
| icon9 = laser hazard
| icon10 = dirty water
| previous = Portal 2 Chapter 2 Test Chamber 1
| next = Portal 2 Chapter 2 Test Chamber 3
}}
}}
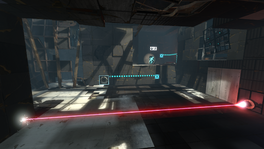
This chamber introduces the [[Discouragement Redirection Cube]] to the player.
This is the eleventh level of the game, and takes place within a dilapidated Test Chamber. This chamber introduces the [[Discouragement Redirection Cube]], and the way in which it can be used in combination with the [[Thermal Discouragement Beam]] in order to activate [[Panels]]. This level also introduces the ability of the Redirect Cube to act as a [[Weighted Storage Cube]] and activate [[Heavy Duty Super-Colliding Super Button]]s.
== Threats faced ==
== Contents ==
=== Mechanics ===
* [[Discouragement Redirection Cube]]
* [[Vital Apparatus Vent]]
* [[Heavy Duty Super-Colliding Super Button]]
* Stairs
* [[Pedestal Button]]
* Laser Receptacles
* Light Strip (blue)
=== Characters ===
* [[Chell]]
* [[GLaDOS]]
* [[Wheatley]]
=== Hazards ===
*[[Thermal Discouragement Beam]]
*[[Thermal Discouragement Beam]]
=== Locations ===
* ''Aperture Science Enrichment Center''
* ''Test Chamber 02 (GLaDOS)''
== Walkthrough ==
== Walkthrough ==
Upon entering the room head to the left to a small cut off alcove which contains a Discouragement Redirection Cube. Shoot a portal through the grating on the floor inside and place one somewhere on your side. Enter through and pick up the Discouragement Redirection Cube. Return back through your portal to the main room and to the [[Thermal Discouragement Beam]]. Place the Discouragement Redirection Cube such that it intercepts the Thermal Discouragement Beam and redirects it into the receptacle. Upon successfully doing this a staircase will appear to the exit. Proceed to the top of the staircase and place a portal on the floor next to you. Place the second portal underneath the Thermal Discouragement Beam you left behind and catch it as it falls through the portal. Place it on the [[Heavy Duty Super-Colliding Super Button]] and exit through the doors.
{{Spoiler|block=yes|
*Upon entering the room head to the left to a small cut off alcove which contains a [[Discouragement Redirection Cube]]. [[Wheatley]] makes a quick appearance here. Shoot a portal through the grating on the floor inside and place one somewhere on your side.
*Enter through and pick up the Discouragement Redirection Cube. Return back through your portal to the main room and to the [[Thermal Discouragement Beam]].
*Place the Discouragement Redirection Cube such that it intercepts the Thermal Discouragement Beam and redirects it into the receptacle.
*Proceed to the top of the newly created staircase and place a portal on the floor. Place the second portal underneath the Discouragement Redirection Cube and catch it as it falls through the portal. Place it on the [[Heavy Duty Super-Colliding Super Button]] and exit into the [[Chamberlock]].
}}
== Video walkthrough ==
== Video walkthrough ==
<!--{{youtube||width=640}}-->
{{walkthrough}}
== Bugs ==
{{Spoiler|block=yes|
*When Wheatley appears in the wall it is possible to grab him if the player is quick enough.
}}
== Trivia ==
* [[Hoopy the Hoop]] can be seen around a panel's hydraulics in this chamber.
{{TestChambersNav}}
[[Category:Portal 2 chambers]]
Latest revision as of 17:40, 16 March 2022
“I can't get over how small you are!” This article is a stub. As such, it is not complete. You can help Portal wiki by expanding it.
Upon entering the room head to the left to a small cut off alcove which contains a Discouragement Redirection Cube. Wheatley makes a quick appearance here. Shoot a portal through the grating on the floor inside and place one somewhere on your side.
Enter through and pick up the Discouragement Redirection Cube. Return back through your portal to the main room and to the Thermal Discouragement Beam.
Place the Discouragement Redirection Cube such that it intercepts the Thermal Discouragement Beam and redirects it into the receptacle.
Proceed to the top of the newly created staircase and place a portal on the floor. Place the second portal underneath the Discouragement Redirection Cube and catch it as it falls through the portal. Place it on the Heavy Duty Super-Colliding Super Button and exit into the Chamberlock.