| screenshot = User Moussekateer Portal 2 Act 2 Test Chamber 01.png
| icon1 = laser sensor on
| icon2 = laser redirection
| icon3 = cube dispenser
| icon4 = cube button
| icon5 = cube hazard
| icon6 = player button
| icon7 = water hazard
| icon8 = turret hazard
| icon9 = laser hazard
| icon10 = dirty water
| previous = Portal 2 Chapter 1 Incinerator
| next = Portal 2 Chapter 2 Test Chamber 2
}}
{| align=right
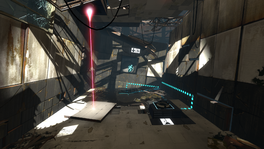
This is the tenth level of the game, and takes place within a dilapidated Test Chamber. This level introduces the [[Thermal Discouragement Beam]], and the way in which it can be used to activate [[Panels]] and thereby grant access to inaccessible areas. This Chamber corresponds with Test Chamber [[Portal Test Chamber 06|06]] from the original [[Portal]].
|[[File:User Moussekateer Portal 2 Act 2 Test Chamber 01.png|right|325px]]
This chamber introduces the [[Thermal Discouragement Beam]] to the player.
== Contents ==
== Threats faced ==
=== Mechanics ===
* [[High Energy Pellet]] - Launcher & Catcher (not working)
* [[Victory Lift]]
* Laser Receptacles
=== Characters ===
* [[Chell]]
* [[GLaDOS]]
* [[Announcer]]
=== Hazards ===
*[[Thermal Discouragement Beam]]
*[[Thermal Discouragement Beam]]
=== Locations ===
* ''Aperture Science Enrichment Center''
* ''Test Chamber 01 (GLaDOS)''
== Walkthrough ==
== Walkthrough ==
Cmon now, really?
{{Spoiler|block=yes|
*Proceed to the [[Victory Lift]].
*While standing on it, shoot a portal on the floor where the [[Thermal Discouragement Beam]] makes contact and place the other portal on the ceiling above the receptacle.
*The Victory Lift will rise, proceed to the [[Chamberlock]].
}}
== Video walkthrough ==
== Video walkthrough ==
{{youtube|EdjHIalEfUY}}
{{walkthrough}}
== Related achievements ==
== Related achievements ==
===Portal 2===
{{Show achievement|Portal 2|Undiscouraged}}
{{Show achievement|Portal 2|Undiscouraged}}
== Trivia ==
* This test is heavily implied to be the same as [[Portal Test Chamber 06|Chamber 06]] from the first game, as [[High Energy Pellet]] emitters and receptacles can be seen being swapped for their laser equivalents.
== Gallery ==
{{Gallery
|lines=2
|height=150
|width=150
|File:Portal 2 Chapter 2 Test Chamber 1 Overview Laser.png|Overview with Thermal Discouragement Beam.
|File:Portal 2 Chapter 2 Test Chamber 1 Overview Pellet.png|Overview with High Energy Pellet Catcher.
|File:Portal chamber06 01.png|alt1=Chamber 04|Test Chamber 06 in Portal.
}}
{{TestChambersNav}}
[[Category:Portal 2 chambers]]
Latest revision as of 14:30, 2 August 2023
Portal 2 Chapter 2 Test Chamber 1
sp_a2_laser_intro.bspLaser Intro
This is the tenth level of the game, and takes place within a dilapidated Test Chamber. This level introduces the Thermal Discouragement Beam, and the way in which it can be used to activate Panels and thereby grant access to inaccessible areas. This Chamber corresponds with Test Chamber 06 from the original Portal.
While standing on it, shoot a portal on the floor where the Thermal Discouragement Beam makes contact and place the other portal on the ceiling above the receptacle.
The Victory Lift will rise, proceed to the Chamberlock.
Undiscouraged Complete the first Thermal Discouragement Beam test
Trivia
This test is heavily implied to be the same as Chamber 06 from the first game, as High Energy Pellet emitters and receptacles can be seen being swapped for their laser equivalents.