This test chamber is the ninth bonus level of the game. It is taken from [[Portal: The Flash Version MapPack]]. The challenges of this level are unlocked when the test chamber is completed once.
This test chamber is the ninth bonus level of the game. It is taken from [[Portal: The Flash Version MapPack]]. The challenges of this level are unlocked when the test chamber is completed once.
=== Mechanics ===
* [[Weighted Storage Cube]]
* [[Vital Apparatus Vent]]
* [[High Energy Pellet]] ''(launcher and catcher)''
* [[Heavy Duty Super-Colliding Super Button|Heavy Duty Super-Colliding Super Button ''(H.D.S.C.S.B)'']]
* [[Victory Lift]]
== Hazards ==
== Hazards ==
* [[High Energy Pellet]]s
* [[High Energy Pellet]]
* [[Turrets]]
* [[Turrets]]
== Walkthrough ==
== Walkthrough ==
<!-- Put the multiple walkthroughs to their respective pages, not all here
* Proceed trough the door and walk to the [[Light Bridge]].
* Wait for the [[High Energy Pellet|Energy Pellet]] to pass by you and walk across the [[Light Bridge]] to get to a safe spot/crevase.
*Test Chamber 01
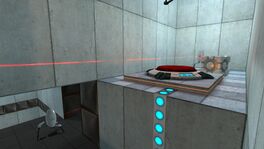
* Place one portal onto the wall that is on the upper floor. The best way you can see the spot where you have to shoot the portal is the wall where the [[Turret]]'s laser is pointing to.
*You start in Test Chamber 01.
* Place the other portal onto the '''X''' mark that can be found above you. The [[High Energy Pellet|Energy Pellet]] is hitting the spot.
*First, you must use a vehicle to jump the ramp to get the Keystone Activator containing the Shift Keystone.
* Wait for the [[High Energy Pellet|Energy Pellet]] to hit the [[Turret]].
*Once the three portals had opened you must go to the computer room using the pink portal and press the switch.
* After you hear the [[Turret]]s scream, walk across the [[Light Bridge]] while avoiding the [[High Energy Pellet|Energy Pellet]]. ''The [[High Energy Pellet|pellet]] is still active, don't think you're safe!''
*Then you must use the yellow portal to reach the victory lift and press the button, that will drop a companion cube in a separate room and you must use Gandalf's magic to levitate the cube to the Heavy Duty Super-Colliding Super Button. That will open the door to the Chamberlock, allowing you to continue to the next room.
* Portal over to the ledge where you placed your first portal.
* Place a portal onto the wall that is connected to the flooring across the gap where the [[High Energy Pellet|Energy Pellet]] wanders around.
Test Chamber 02
* Walk onto the previously-talked-about ledge but portaling over.
In this test chamber, you first have to break the giant storage cubes to the right of the entrance and rebuild them into a grapple switch to open a panel and press the button, that will unlock the red Chroma platform. Then destroy the remaining cubes and rebuild them in an accelerator switch treadmill. Use a vehicle to activate it, that will raise a panel with the blue Chroma platform. Now that you have all the platforms activate the Chroma keystone and form the colors blue on the right, red on the center and green on the left, once the puzzle is solved you are going to unlock an aerial faith plate. Now activate the Elemental keystone's fire element and jump into the aerial faith plate to cross over the fire panels into the next area, once there activate the electricity element to cross over the electrified panels. Once you reach the other side press a button, that will drop an edgeless safety cube and charge the two electrical panels to activate the hard light bridges and the pistons to move the cube into the super button. Then proceed into the chamberlock to move into the next test chamber.
* Proceed trough the hallway.
* Portal behind the [[Vital Apparatus Vent|Cube Dropper]].
Test Chamber 03
* Knock the [[Turret]] that is guarding the [[Button]] over.
You first have to use Batman's grapple ability to pull a grapple point and unlock the Locate keystone. Use it to summon a Talking Tree, who will remove the first line of turrets with his branches. Then activate the scale keystone to shrink yourself to pass into a small room, once there go to the panel with the big green button an enlarge yourself to press it, that will throw the remaining turrets into the goo. GLaDOS will deploy a prototype Super Deadly Mega Turret in a glass box, use Gandalf magic to destroy the glass by moving it and proceed to destroy the remaining glasses to press the buttons. You have to press the buttons at the same time to open the door.
* Place a nearby [[Cube]] onto the previously-guarded [[Button]] to activate it.
* Walk back to the [[High Energy Pellet|Energy Pellet]] and place the other portal onto the '''X''' mark on the ceiling.
Test Chamber 04
** If you've placed a blue portal behind the [[Button]], place the orange one onto the '''X''' mark and vice versa.
On this test chamber, first, you have to use the locate keystone to summon Doc Brown and his Traveling Time Train to smash through two boxes that contains two buttons. After that, a receptacle will release a high energy pellet and flames and electricity will surround the buttons. You have to use the elemental keystone to pass the hazards and press the buttons to move a panel, first press the left button and then the right one. That will redirect the high energy pellet to the other receptacle. Finally, you have to use the Shift keystone (or use a flying character) to send the characters to the three heavy-duty super-colliding super buttons to redirect another high energy pellet.
* Walk trough the hallway and steer to the right.
* Jump into the "pit".
Test Chamber 05
* Stand on the [[Button]] that is in the "pit".
Here you must use the Scale mode to shrink you and pass through the small tunnel. Once you do it you must enlarge your character and throw the yellow Chroma platform off the room. Then you must use the Locate mode to summon Homer Simpson on a wrecking ball to break the cubes. This will unlock the Chroma ability but to use it you first must destroy a turret that blocks the way to the red Chroma platform, to do this redirect the laser beam using the Discouragement Redirection Cubes. Once you got the three Chroma's colors (Red, Blue and Yellow) you are able to destroy the remaining turrets. After that, you will encounter Wheatley in a vent and you must use Gandalf's magic to remove the screws. Then you have to follow Wheatley to the abandoned areas of the facility. Once there you must use Batman's grapple to pull a grapple point that will activate the panels allowing you to reach the next part of the area. After that, you must use Gandalf's magic to remove the bricks that block the pass.
* Wait for the [[High Energy Pellet|Energy Pellet]] to be received by the catcher.
-->
* After you've heard the receive noise, walk back to the [[Vital Apparatus Vent|Cube Dropper]].
* Place a portal trough the now opened door onto the only portalable surface.
* Go trough the portals and wait for the [[Victory Lift|Lift]] to descend.
* While waiting, place a portal under the [[Turret]] that is guarding the path to the [[Chamberlock]]
** You can also knock the [[Turret]] over without portals. Both do the trick.
* Proceed to the [[Chamberlock]].
== Video walkthrough ==
== Video walkthrough ==
Latest revision as of 09:45, 1 February 2024
“I can't get over how small you are!” This article is a stub. As such, it is not complete. You can help Portal wiki by expanding it.
Still Alive 09
stillalive_9.bsp
This test chamber is the ninth bonus level of the game. It is taken from Portal: The Flash Version MapPack. The challenges of this level are unlocked when the test chamber is completed once.
Proceed trough the door and walk to the Light Bridge.
Wait for the Energy Pellet to pass by you and walk across the Light Bridge to get to a safe spot/crevase.
Place one portal onto the wall that is on the upper floor. The best way you can see the spot where you have to shoot the portal is the wall where the Turret's laser is pointing to.
Place the other portal onto the X mark that can be found above you. The Energy Pellet is hitting the spot.