<td colspan="2"><span class="spoiler-text">Open the first part of chamber by standing on [[Heavy Duty Super-Colliding Super Button#Heavy Duty Super Button|the red circular buttons]].</span></td></tr>
<td colspan="2"><span class="spoiler-text">Open the first part of chamber by standing on [[Heavy Duty Super-Colliding Super Button#Heavy Duty Super Button|the red circular buttons]].</span></td></tr>
<tr>
<tr>
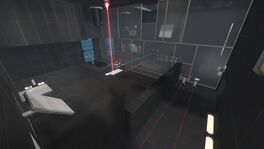
<th scope="row">2</th><td><span class="spoiler-text">Place the 1st portal to the left of the entrance. Turn right and place the 2nd portal a little above you, which is facing the right side. Wait for the other character to destroy the first pair [[turrets]] on the left. Wait for the other character to bring [[Discouragement Redirection Cube]] to the left side. Take [[Discouragement Redirection Cube]] and move along the cyan/yellow dots and a collapsible bridge. Wait for the other character to deploy the collapsible bridge for you. Wait for the other character to redirect [[Thermal Discouragement Beam]] to the left side. Rotate [[Discouragement Redirection Cube]] in order to destroy the second pair [[turrets]] on the right side for for the other character. Continue with [[Discouragement Redirection Cube]] until the end of the first part with [[Heavy Duty Super-Colliding Super Button#Weighted Storage Cube Receptacle|the red rectangular button]].</span></td><td><span class="spoiler-text"></span></td></tr>
<th scope="row">2</th><td><span class="spoiler-text">Place the 1st [[portal]] to the left of the entrance. Turn right and place the 2nd [[portal]] a little above you, which is facing the right side. Wait for the other character to destroy the first pair [[turrets]] on the left. Wait for the other character to bring [[Discouragement Redirection Cube]] to the left side. Take [[Discouragement Redirection Cube]] and move along the cyan/yellow dots and a collapsible bridge. Wait for the other character to deploy the collapsible bridge for you. Wait for the other character to redirect [[Thermal Discouragement Beam]] to the left side. Rotate [[Discouragement Redirection Cube]] in order to destroy the second pair [[turrets]] on the right side for for the other character. Continue with [[Discouragement Redirection Cube]] until the end of the first part with [[Heavy Duty Super-Colliding Super Button#Weighted Storage Cube Receptacle|the red rectangular button]].</span></td><td><span class="spoiler-text"></span></td></tr>
<tr>
<tr>
<th scope="row">3</th><td><span class="spoiler-text">Leave [[Discouragement Redirection Cube]] on the [[Heavy Duty Super-Colliding Super Button#Weighted Storage Cube Receptacle|the red rectangular button]] and proceed to the second part.</span></td><td><span class="spoiler-text"></span></td></tr>
<th scope="row">3</th><td><span class="spoiler-text">Leave [[Discouragement Redirection Cube]] on the [[Heavy Duty Super-Colliding Super Button#Weighted Storage Cube Receptacle|the red rectangular button]] and proceed to the second part.</span></td><td><span class="spoiler-text"></span></td></tr>
Revision as of 17:19, 27 March 2023
Co-op Course 6 Chamber 1
mp_coop_separation_1.bsp01 Separation
This is the first test chamber of the Peer Review additional testing course, Art Therapy. It takes place much years later after the final events of the main coop campaign. The players must use their knowledge in lasers, flinging and advanced timing in order to pass this chamber.
Shoot 7th and 8th portals on the only angled white walls above the Goo. Wait for the other character to catch the cube. Continue with portal 9th on the left vertical wall. Continue with portal 10th across the Goo. Follow the white evacuation signs to get to the exit.