Portal 2 Chapter 1 Test Chambers 7 & 8: Difference between revisions
Jump to navigation
Jump to search


Moussekateer (talk | contribs) mNo edit summary |
m (+walkthrough) |
||
| Line 6: | Line 6: | ||
| screenshot = Portal 2 Chapter 1 Test chambers 7 & 8.png | | screenshot = Portal 2 Chapter 1 Test chambers 7 & 8.png | ||
| noprogress = true | | noprogress = true | ||
| number = 07 | |||
| total = 10 | |||
| icon1 = cube dispenser | |||
| icon2 = cube button | |||
| icon3 = cube hazard | |||
| icon4 = player button | |||
| icon5 = water hazard | |||
| icon6 = fling enter | |||
| icon7 = fling exit | |||
| icon8 = turret hazard | |||
| icon9 = dirty water | |||
| icon10 = blades hazard | |||
| previous = Portal 2 Chapter 1 Test Chamber 6 | | previous = Portal 2 Chapter 1 Test Chamber 6 | ||
| next = Portal 2 Chapter 1 Her Chamber | | next = Portal 2 Chapter 1 Her Chamber | ||
| Line 14: | Line 26: | ||
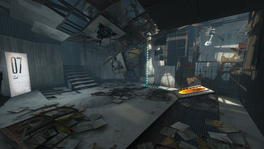
== Walkthrough == | == Walkthrough == | ||
{{spoiler|block=yes| | |||
* Drop into the chamber, look to the left and fire a portal into the adjacent chamber. | |||
* Wait for [[Wheatley]] to detach from his rail, and catch him. | |||
* Plug Wheatley into the wall socket, follow Wheatley's instructions and wait for him to open the passageway. | |||
* Follow the walkway to the end of the level, the [[Oracle Turret]] is visible here. | |||
}} | |||
== Video walkthrough == | == Video walkthrough == | ||
| Line 24: | Line 42: | ||
|lines=1 | |lines=1 | ||
|File:Portal 2 Chapter 1 Test Chambers 7 & 8 reunion.png|alt1=The reunion with Wheatley|The reunion with Wheatley. | |File:Portal 2 Chapter 1 Test Chambers 7 & 8 reunion.png|alt1=The reunion with Wheatley|The reunion with Wheatley. | ||
|File:Portal 2 Chapter 1 Test Chambers 7 & 8 turret.png|alt2=The Oracle Turret|The [[Oracle Turret]] | |File:Portal 2 Chapter 1 Test Chambers 7 & 8 turret.png|alt2={{spoiler|The Oracle Turret}}|{{spoiler|The [[Oracle Turret]]}}|spoiler2=yes | ||
}} | }} | ||
{{TestChambersNav}} | {{TestChambersNav}} | ||
[[Category:Portal 2 chambers]] | [[Category:Portal 2 chambers]] | ||
Revision as of 18:00, 22 June 2011
 | “I can't get over how small you are!” This article is a stub. As such, it is not complete. You can help Portal wiki by expanding it. |
Chapter 1 - Test Chambers 07 & 08
sp_a1_intro7.bsp

Hazards
None
Walkthrough
- Drop into the chamber, look to the left and fire a portal into the adjacent chamber.
- Wait for Wheatley to detach from his rail, and catch him.
- Plug Wheatley into the wall socket, follow Wheatley's instructions and wait for him to open the passageway.
- Follow the walkway to the end of the level, the Oracle Turret is visible here.
Video walkthrough
Gallery
|

