This is the twenty-fifth level of the game, and is set within a dilapidated Test Chamber. This level requires the player to use the [[Thermal Discouragement Beam]] in order to deal with multiple [[Turrets]], by destroying them with the Discouragement Beam. {{Spoiler|This level also contains a Rat Man [[Den]].}}
This is the twenty-fifth level of the game, and is set within a dilapidated Test Chamber. This level requires the player to use the [[Thermal Discouragement Beam]] in order to deal with multiple [[Turrets]], by destroying them with the Discouragement Beam. {{Spoiler|This level also contains a Rat Man [[Den]].}}
== Hazards ==
== Contents ==
=== Mechanics ===
* Laser Receptacle
* [[Weighted Storage Cube]]
* [[Heavy Duty Super-Colliding Super Button]]
* [[Discouragement Redirection Cube]]
* Glass
* Light Strip (blue, white, pink)
=== Characters ===
* [[Chell]]
* [[GLaDOS]]
* [[Prima Donna Turret]]
=== Objective ===
* Complete GLaDOS' Test Shaft (Test Chamber 16)
=== Hazards ===
*[[Thermal Discouragement Beam]]
*[[Thermal Discouragement Beam]]
*[[Turrets]]
*[[Turrets]]
=== Locations ===
* ''Aperture Science Enrichment Center''
* ''Test Chamber 16 (GLaDOS)''
== Walkthrough ==
== Walkthrough ==
Line 54:
Line 76:
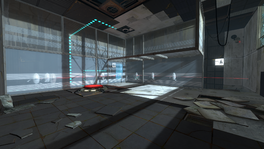
|File:Portal 2 Chapter 3 Test Chamber 16 overview.png|alt1=An overview of the Test Chamber|An overview of the Test Chamber.
|File:Portal 2 Chapter 3 Test Chamber 16 overview.png|alt1=An overview of the Test Chamber|An overview of the Test Chamber.
|File:Portal 2 Chapter 3 Test Chamber 16 secret.png|alt3=Turrets practicing for the Turret Opera|Turrets practising for the Turret Opera.
|File:Portal 2 Chapter 3 Test Chamber 16 secret.png|alt3=Turrets practicing for the Turret Opera|Turrets practicing singing
|File:Portal 2 Chapter 3 Test Chamber 16 den.png|alt3=A Rat Man Den in the Test Chamber|A [[Doug Rattmann|Rat Man]] den in the Test Chamber.
|File:Portal 2 Chapter 3 Test Chamber 16 den.png|alt3=A Rat Man Den in the Test Chamber|A [[Doug Rattmann|Rat Man]] den in the Test Chamber.
|File:Portal 2 Chapter 3 Test Chamber 16 full view.png|alt3=Another view of the test chamber|Another view of the test chamber
}}
}}
== Easter Eggs ==
== Easter Eggs ==
* {{Spoiler|If the player destroys the Turret sitting behind the grating as they enter, using the Thermal Discouragement Beam, they can find an alcove behind from which they can observe 4 Turrets and the Prima Donna Turret practising [[Portal 2 soundtrack|Turret Wife Serenade]] .
* {{Spoiler|If the player destroys the Turret sitting behind the grating as they enter, using the Thermal Discouragement Beam, they can find an alcove behind from which they can observe 4 Turrets and the Prima Donna Turret practising [[Portal 2 soundtrack|Turret Wife Serenade]].}}
{{TestChambersNav}}
{{TestChambersNav}}
[[Category:Portal_2_chambers]]
[[Category:Portal_2_chambers]]
Latest revision as of 12:32, 9 October 2022
“I can't get over how small you are!” This article is a stub. As such, it is not complete. You can help Portal wiki by expanding it.
Portal 2 Chapter 3 Test Chamber 16
sp_a2_laser_vs_turret.bspLaser vs. Turret
This is the twenty-fifth level of the game, and is set within a dilapidated Test Chamber. This level requires the player to use the Thermal Discouragement Beam in order to deal with multiple Turrets, by destroying them with the Discouragement Beam. This level also contains a Rat Man Den.
If the player destroys the Turret sitting behind the grating as they enter, using the Thermal Discouragement Beam, they can find an alcove behind from which they can observe 4 Turrets and the Prima Donna Turret practising Turret Wife Serenade.