This test chamber is the tenth extra bonus level from [[Portal: Still Alive]]. It is taken from [[Portal: The Flash Version MapPack]].
{{stub}}
{{Chamber infobox
| title = Still Alive 10
| map = stillalive_10.bsp
| number = 10
| total = 14
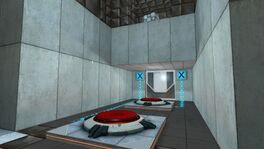
| screenshot = Still Alive 10.png
| icon1 = zap camp on
| icon2 = cube hazard
| icon3 = pellet hazard
| icon4 = pellet catcher
| icon5 = water hazard on
| icon6 = put a portal bellow
| icon7 = still alive laser field on
| icon8 = turret hazard
| icon9 = crusher hazard
| icon10 = cake
| previous = Portal: Still Alive Test Chamber 9 (Bonus)
| next = Portal: Still Alive Test Chamber 11 (Bonus)
}}
This test chamber is the tenth bonus level of the game. It is taken from [[Portal: The Flash Version MapPack]]. The challenges of this level are unlocked when the test chamber is completed once.
=== Mechanics ===
* [[Weighted Storage Cube]]
* [[Heavy Duty Super-Colliding Super Button|Heavy Duty Super-Colliding Super Button ''(H.D.S.C.S.B)'']]
* Door ''(Vertical. Test Chamber)
== Hazards ==
== Hazards ==
* To do
* [[Electricity Field]]
* [[Goo]]
* [[Laser Field]]
== Walkthrough ==
== Walkthrough ==
* To do
* Start the chamber by going to the left alcove next to the [[Button]]s.
* Place a portal onto the ceiling surface.
* Place an another portal beneath you and while falling, place the portal that you've placed o the ceiling onto the sliver of a white part of the wall above the door. You'll be launched to the [[Cube]]. (don't be worried of you take damage, you won't die!)
* Place a portal through the square-shaped hole in the wall.
* Jump down to the [[Button]]s with the [[Cube]] you've just acquired and place it on one of the [[Button]]s.
* Place an another portal on a nearby wall and walk onto the [[Light Bridge]].
* Teleport onto the upper half of the floor, where you'll encounter a [[Electricity Field]].
* Wait for the right time (when it's turned off) and walk over it.
* Slide to the right into a small hatch (an arrow is pointing to the right spot).
* Portal trough a square-shaped hole in the wall across the [[Electricity Field]].
* Walk over the small steps/staircase that is to your left.
* ''Don't fall into the [[Laser Field]]!'' Instead, place a portal onto the wall across the, so-called, "cube trap".
* Place the other portal underneath the [[Cube]].
* Slide back to the starting spot, down the staircase, and again, place the portal that you've put under the [[Cube]] onto the walls.
* The cube should be automatically placed onto the [[Button]].
** If it's not, readjust its position so it is activating the [[Button]].
* Place a portal on the small white panel that you'll see trough the opened alcove.
* Grab the [[Cube]] and go trough the portal that is closer to the [[Button]] the [[Cube]] just activated.
* Place the [[Cube]] onto the remaining [[Button]] that is not activated.
* Proceed trough the opened door. ''Be careful! You'll need to jump over the [[Goo]] to proceed to the [[Chamberlock|ending elevator]].''
* Continue to the [[Chamberlock]].
== Video walkthrough ==
== Video walkthrough ==
* To do
{{youtube|--VgJ9VZCUo|hd=on}}
== Award requirements (challenge mode) ==
{{Bonus goals|13|9|7|150|110|70|135|70|45}}
== Video strategies (challenge mode) ==
=== Portals challenge ===
{{youtube|uotCa8hD9tE|hd=on}}
=== Steps challenge ===
{{youtube|b3bSQ00Tah8|hd=on}}
=== Time challenge ===
{{youtube|Hb2XXLFcoW8|hd=on}}
{{TestChambersNav}}
{{TestChambersNav}}
[[Category:Portal: Still Alive chambers]]
[[Category:Portal: Still Alive chambers]]
Latest revision as of 22:32, 6 November 2023
“I can't get over how small you are!” This article is a stub. As such, it is not complete. You can help Portal wiki by expanding it.
Still Alive 10
stillalive_10.bsp
This test chamber is the tenth bonus level of the game. It is taken from Portal: The Flash Version MapPack. The challenges of this level are unlocked when the test chamber is completed once.
Start the chamber by going to the left alcove next to the Buttons.
Place a portal onto the ceiling surface.
Place an another portal beneath you and while falling, place the portal that you've placed o the ceiling onto the sliver of a white part of the wall above the door. You'll be launched to the Cube. (don't be worried of you take damage, you won't die!)
Place a portal through the square-shaped hole in the wall.
Jump down to the Buttons with the Cube you've just acquired and place it on one of the Buttons.
Place an another portal on a nearby wall and walk onto the Light Bridge.
Teleport onto the upper half of the floor, where you'll encounter a Electricity Field.
Wait for the right time (when it's turned off) and walk over it.
Slide to the right into a small hatch (an arrow is pointing to the right spot).
Portal trough a square-shaped hole in the wall across the Electricity Field.
Walk over the small steps/staircase that is to your left.
Don't fall into the Laser Field! Instead, place a portal onto the wall across the, so-called, "cube trap".