This is the ninth level in [[Cooperative Testing Initiative]] of [[Portal 2]] and the second chamber in the course. Players need to utilize their flinging techniques along with timing to complete the chamber.
== Summary ==
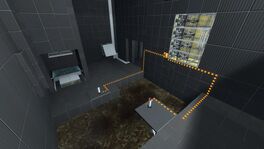
{{Spoiler|block=on|There is a small area with the [[Material Emancipation Grill]] where the partner can fire the portals to the roof and floor making an infinite loop. There is also angled panels aimed at a switch-activated obstacle, which is over a pool of Goo. The partners have to help the other one to fling across the chamber.}}
== Contents ==
=== Mechanics ===
* [[Switch]]
=== Hazards ===
* [[Goo]]
== Walkthrough ==
{{Coop walkthrough table
| atlas-1 = {{Spoiler|Go to the chamber and put your portals on the roof panels and the floor panels the small area.}}
| pbody-1 = {{Spoiler|Stand in the small area and wait for your partner to fling you to the other side of the chamber.}}
| atlas-2 = {{Spoiler|Stand next to the [[Switch]] and press it. Then place the portal from the floor panels portal on the angled panels and press the switch again just to be safe.}}
| pbody-3 = {{Spoiler|Fire your portals the same way as your partner did and go stand near the switch.}}
| atlas-5 = {{Spoiler|Get to the small area where your partner was and wait for your partner to fling you to the other side of the chamber.}}
| pbody-6 = {{Spoiler|Press the switch and put the portal from the floor panels to the angled panels and then press the switch again just to be safe.}}
| both-7 = {{Spoiler|Proceed to the disassembly area.}}
}}
== Video walkthrough ==
{{youtube|osnkpxIeBdQ}}
== Related achievements ==
{{Achievement table
| col1 =
{{Show achievement|Portal 2|Confidence Building}}
| col2 =
{{Show achievement|Portal 2|Triple Crown}}
}}
}}
{{TestChambersNav}}
{{TestChambersNav}}
[[Category:Portal 2 Co-op chambers]]
{{needimage}}
Latest revision as of 04:41, 13 June 2023
Co-op Course 2 Chamber 2
mp_coop_infinifling_train.bspInfinifling
This is the ninth level in Cooperative Testing Initiative of Portal 2 and the second chamber in the course. Players need to utilize their flinging techniques along with timing to complete the chamber.
There is a small area with the Material Emancipation Grill where the partner can fire the portals to the roof and floor making an infinite loop. There is also angled panels aimed at a switch-activated obstacle, which is over a pool of Goo. The partners have to help the other one to fling across the chamber.
Go to the chamber and put your portals on the roof panels and the floor panels the small area.
Stand in the small area and wait for your partner to fling you to the other side of the chamber.
2
Stand next to the Switch and press it. Then place the portal from the floor panels portal on the angled panels and press the switch again just to be safe.
3
Fire your portals the same way as your partner did and go stand near the switch.
5
Get to the small area where your partner was and wait for your partner to fling you to the other side of the chamber.
6
Press the switch and put the portal from the floor panels to the angled panels and then press the switch again just to be safe.