Portal Test Chamber 17 (Bonus): Difference between revisions
Jump to navigation
Jump to search


mNo edit summary |
|||
| Line 36: | Line 36: | ||
=== Time === | === Time === | ||
- | * Grab the cube, get up the steps and run along the two pellet corridors PDQ. | ||
* When you reach the catwalk above the main chamber, go to the end and use a twisting motion to fling the cube as far as you can down the side passage where the lifts are. | |||
* As you turn back, shoot a portal at the camera above the doorway across from the side passage. Turn back to the camera above the stairs where you just came out, and shoot the other portal at it. Grab that camera, take it to the end of the catwalk and throw it down after the cube. | |||
* As you jump down into the side passage, shoot a portal at the wall opposite. Shoot the other portal at the camera from above the doorway, which should now be lying on the portal-friendly floor. Grab the camera and carry it down to the end of the passage. | |||
* Stack the two cameras beside the exit ledge, put the cube on top and scramble up. Turn and crouch to retrieve your cube, and get going. | |||
}} | }} | ||
Revision as of 09:39, 26 November 2012
 | “I can't get over how small you are!” This article is a stub. As such, it is not complete. You can help Portal wiki by expanding it. |
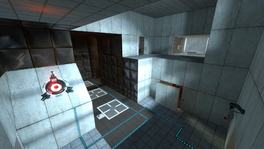
Test Chamber 17
testchmb_a_13.bsp

This is the fifth Bonus map of the game. It is unlocked when the original Test Chamber 17 has been completed.
Hazards
Strategy
Portals
- Use two portals to get into the rat hole behind the projecting panel and bring out all the security cameras.
- Stack the cameras up in the recess where you're supposed to jump across from the last lift platform. Put the Weighted Companion Cube on top and scramble up.
- Turn back at the edge and crouch down to pick up the Weighted Companion Cube, then you can be on your merry way.
Steps
-To do-
Time
- Grab the cube, get up the steps and run along the two pellet corridors PDQ.
- When you reach the catwalk above the main chamber, go to the end and use a twisting motion to fling the cube as far as you can down the side passage where the lifts are.
- As you turn back, shoot a portal at the camera above the doorway across from the side passage. Turn back to the camera above the stairs where you just came out, and shoot the other portal at it. Grab that camera, take it to the end of the catwalk and throw it down after the cube.
- As you jump down into the side passage, shoot a portal at the wall opposite. Shoot the other portal at the camera from above the doorway, which should now be lying on the portal-friendly floor. Grab the camera and carry it down to the end of the passage.
- Stack the two cameras beside the exit ledge, put the cube on top and scramble up. Turn and crouch to retrieve your cube, and get going.
Award requirements
| Portals | Steps | Time | ||||||
|---|---|---|---|---|---|---|---|---|
| Bronze | Silver | Gold | Bronze | Silver | Gold | Bronze | Silver | Gold |
| 4 Portals | 3 Portals | 2 Portals | 215 Steps | 175 Steps | 150 Steps | 160 Seconds | 105 Seconds | 87 Seconds |