Portal 2 Sixense MotionPack DLC Test Chamber 4: Difference between revisions
Jump to navigation
Jump to search


(added map name) |
|||
| (4 intermediate revisions by 3 users not shown) | |||
| Line 3: | Line 3: | ||
{{Chamber infobox | {{Chamber infobox | ||
| title = Test Chamber 04 | | title = Test Chamber 04 | ||
| map = | | map = sp_a3_sx_shield.bsp | ||
| screenshot = Portal 2 Sixense MotionPack DLC Test Chamber | | screenshot = Portal 2 Sixense MotionPack DLC Test Chamber 4.jpg | ||
| total = 07 | | total = 07 | ||
| number = 04 | | number = 04 | ||
| Line 17: | Line 17: | ||
| icon9 = turret hazard on | | icon9 = turret hazard on | ||
| icon10 = dirty water | | icon10 = dirty water | ||
| previous = Portal 2 Sixense MotionPack DLC | | previous = Portal 2 Sixense MotionPack DLC Test Chamber 3 | ||
| next = Portal 2 Sixense MotionPack DLC | | next = Portal 2 Sixense MotionPack DLC Test Chamber 5 | ||
}} | }} | ||
| Line 48: | Line 48: | ||
== Video walkthrough == | == Video walkthrough == | ||
{{ | {{youtube|xUncka17pnc|hd=on|widths=960,720,512,384}} | ||
{{TestChambersNav}} | {{TestChambersNav}} | ||
[[Category:Portal 2 Sixense MotionPack DLC chambers]] | [[Category:Portal 2 Sixense MotionPack DLC chambers]] | ||
Latest revision as of 19:49, 17 August 2013
 | “I can't get over how small you are!” This article is a stub. As such, it is not complete. You can help Portal wiki by expanding it. |
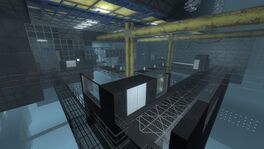
Test Chamber 04
sp_a3_sx_shield.bsp

This is the fourth chamber from the Portal 2 Sixense MotionPack DLC.
Hazards
Walkthrough
- Jump down on to the light bridge below you.
- Turn around and place a portal where the light bridge meets a portalable surface.
- Turn around and look up, place the second portal on the portalable surface above a turret.
- Turn around and go through the Portal.
- When facing the turret, shielded by the light bridge, turn right. Place the second Portal on the portalable surface closest to the walk-way.
- Turn right again, and turn the original portal 90 degrees in any direction. Make sure the light bridge can still travel through it.
- Turn left, and walk along the walkway - shielded from turrets by the light bridge.
- At the corner of the walkway, turn left and place the second portal on the portalable surface in view.
- At the second corner, turn left and place the second portal on the portalable floor.
- Drag the second portal to shield you from the turret, as you walk along this walkway.
- Turn left at the end of the walkway, and place the second on the portalable surface in view.
- Turn left again and place the first portal on the floor you just walked past.
- Go through this first portal and get rid of the turret you land on.
- If facing a door, turn around so you're looking at the light-bridge. Place the first portal at where the light-bridge meets a portalable surface.
- Walk through this first portal and along the lightbridge.
- Drop down from the lightbridge and proceed into the Chamberlock