Portal 2 Chapter 8 Test Chamber 12: Difference between revisions
No edit summary |
(→Layout) |
||
| Line 65: | Line 65: | ||
*This is the only test chamber to freature the laser field in the entire game. | *This is the only test chamber to freature the laser field in the entire game. | ||
**This level introduces the only test element that does not appear in the Coop. | **This level introduces the only test element that does not appear in the Coop. | ||
==See also== | ==See also== | ||
Revision as of 20:18, 28 December 2021
 | “I can't get over how small you are!” This article is a stub. As such, it is not complete. You can help Portal wiki by expanding it. |
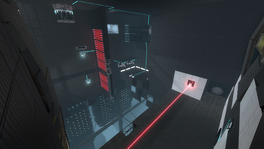
This is the fifty-fourth level of the game, and takes place within an incomplete Aperture Science Test Chamber and the maintenance areas of the facility. This level introduces the Laser Field, and features the Thermal Discouragement Beam as its primary mechanic.
Hazards
- Falling to your death
- Thermal Discouragement Beam
- Laser Field
Walkthrough
- Fire a portal at the end of the Thermal Discouragement Beam and the other one on the wall on the left activating the lower recepticle.
- Wait for the platform to move to the left and then shoot a portal on the wall above it.
- Go through the portal and land on the platform.
- Shoot the same portal at the end of the Beam activating the platform.
- When the platform is halfway through, shoot the other portal on the wall above disabling the laser field.
- Move to the other side of the wall and fire the same portal on the wall activating the moving platform.
- Wait for the platform to move to the other side and then drop down to the floor.
- Wait for the platform to move to the other side and then fire a portal on the wall next to you.
- Push the Switch and fire a portal on the wall above the plaform. Go through the portal.
- Place a portal at the end of the Beam and then put the other portal on the wall opposite of the lower receptacle.
- Wait for the platform to be halfway through and then fire the same portal on wall opposite of the upper receptacle.
- Pick up the Discouragement Redirection Cube and go to the other side of the laser field and then place the same portal on the wall activating the lower receptacle again.
- Wait for the platform to be completely on the other side an then fire the same portal to the wall directly on the opposite wall.
- Aim the cube to activate the receptacle on the opposite wall. Then go to the left and drop down to the area below.
- Shoot one of the portals on the wall near you and go through it.
- Place the portal back where it was and go in the Chamberlock.
- Go in the Excursion Funnel and wait until Wheatley turns it off.
- Go through the door in the corner and drop down from the catwalk to the lower one.
- Drop down in the room.
Video walkthrough
Related achievements
| Smash TV Break 11 test chamber monitors |
Music
TEST by Aperture Science Psychoacoustics Laboratory [6:14] | ![]() Download |
Download | ![]() Play
Play
Trivia
- This is the only test chamber to freature the laser field in the entire game.
- This level introduces the only test element that does not appear in the Coop.
See also
Transcript
GLaDOS: Ohh, my facility.

GLaDOS: This place is self-destructing, you idiot!

Wheatley: Was. Was self-destructing - already fixed.

Wheatley: Programmed in one last tremor, for old time's sake.

GLaDOS: Two. One or two more tremors in there, just for fun.

Announcer: Warning. Core overheating. Nuclear meltdown imminent.

Wheatley: I let him keep his job. I'm not a monster. Ignore what he's saying though. Just keep on testing.

Wheatley: Alright, still though, let's keep moving. Sorry about the lift - it's out of service.

Wheatley: Might as well, you know, give you the tour.

Wheatley: To your left, you'll see some lights. Of some kind.


