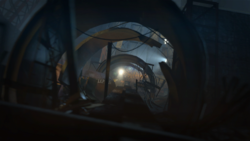
In the Central AI Chamber at the end of the Portal 2 chapter The Escape, Wheatley plugs GLaDOS' memory to a potato, and put her with Chell in the elevator connected to the chamber. As GLaDOS explains him who he really is and calls him a moron, he has a fit of rage, and smashes the elevator several times until it is set loose into the shaft. The next chapter, The Fall, opens as Chell and the now potato-powered GLaDOS fall into the 4375 meter-deep elevator shaft, an employee access to Test Shaft 09. During the fall, GLaDOS (now nicknamed "PotatOS"[3]) tells Chell more about Wheatley's background and how him being in charge of the facility is a catastrophe. At the end of the fall, the lowest part of the shaft appears to be destroyed and does not reach the floor; Chell and PotatOS fall onto the ground, and Chell passes out. When she wakes up, she witnesses PotatOS being pecked by a crow who quickly takes her away (while it is the same model, it is unknown if it is the same bird that attacked Wheatley earlier), and the elevator dangling at the end of the destroyed shaft up above.
Chell then proceeds to an area that seems part ruined / part in construction, one of the two entrances to Test Shaft 09 to be used only by employees. Large pillars appear to support the modern facility above, and are marked with the number "09" and the name "Tartaros". In the Greek mythology, Tartaros is a large gloomy pit or abyss used as a dungeon of torment and suffering that resides beneath the underworld, and where several Titans were sent by Zeus for punishment; this is paralleled here, with Chell being sent in large gloomy abyss as a punishment from Wheatley. "09" is probably related to this particular area of the mines, since the Enrichment Shaft located nearby bears the same number. Also above these pillars there seem to be new GlaDOS style test chambers as there are modern lighting apparatuses.
Aided by her ASHPD creating portals on the portalable surfaces, Chell proceeds through the area, which is still fully powered, with ongoing fires of carcasses of Sentry Turrets. Many red cranes can also be seen; many other pillars and cranes appear to extend very far under the facility, possibly in areas bearing other numbers. The whole area seems to be uncompleted, as many scaffolds are still in place.
Chell then finds herself facing a wall barring the way to the "condemned testing area" of Test Shaft 09, condemned by vitrification on June 15, 1961, with three small shut doors. There two signs indicate the current status and condemnation date of the shaft mentioned above. Many "Keep out" and "Do not enter" signs are present. Conversion Gel pipes are also seen coming from above, disappearing farther into the rock. Thanks to her portal gun, Chell easily circumvents the wall, and proceeds through a narrow path along which a pipe runs, until she reaches the Abandonment Hatch.
====Abandonment Hatch====
The Abandonment Hatch is a gargantuan metal hatch that seals Test Shaft 09 from that part of the facility. There the condemnation date is seen again. To open the hatch, two persons have four seconds to press the two "Hatch Reclusion Override" buttons each found in the two cabins located on left and right of the hatch, each with a countdown outside of them. As Chell is alone, she uses her portals to push both buttons. When the hatch opens, it reveals it was hiding only a small human-size door (along with a chair and knocked down stool), the rest of the hatch space being a mere wall, a rather (purposely) anticlimactic result. Beyond the door is a small corridor leading to another small door, itself leading to the very bottom of the proper Test Shaft 09.
{{TestChambersNav}}
{{TestChambersNav}}
[[Category:Portal 2 chambers]]
[[Category:Portal 2 chambers]]
Revision as of 20:12, 28 December 2021
“I can't get over how small you are!” This article is a stub. As such, it is not complete. You can help Portal wiki by expanding it.
This is the thirty-sixth level of the game and the first part of Chapter 6. It is set within the ruins of the old Aperture Science Enrichment Center. This level does not feature any significant Portal-based challenges.
Wait until you've fallen to the bottom and regained consciousness and then walk to the left side of the fire.
Fire a portal on the lighted wall on the left and the other through the fence on the right to the wall. Go through the first portal.
Shoot the first portal above the ledge to the panels facing down and go through the portal.
Go forwards between the two walls and turn left and go to the end of the corridor.
Fire a portal to the wall at the end of the corridor and place the other one to the lighted wall on the right behind the fence.
Jump down to the concrete beam and go forward.
Turn left upon reaching the end of the beam and go forwards.
Go to the right and fire a portal to the white wall and the other one to the lighted wall higher up (near the '09'-numbers). Go through the portal.
Place the other portal to the opposite side on the lighted wall. Go through the portal.
Go down the catwalk and shoot a portal on the wall below. Shoot the other portal on the wall next to you.
Proceed to the right and drop down. Continue by walking along the path.
You'll reach a catwalk and at the end of it is a Circuit Breaker. Pull the lever and go through the door on the right.
Head for the catwalk on the center and go left. Shoot a portal on the wall above the catwalk leading to the control room. Place the other portal at the end of your catwalk. Go through the portal.
Put a portal inside the control room on the opposite side of the button. Then shoot another portal above the catwalk leading to the other control room. Go through the portal.
Go inside the other control room and then shoot the portal on the wall opposite side of the button. Now you should have your portals in both of the control rooms.
Push the button, go through the portal and push the other button to open the door before the countdown ends.
Proceed to the door that you just opened and open a normal door on the wall and go inside.
Trivia
The Pit is divided into 11 parts. The player is teleported into each of them when falling.