Portal Test Chamber 16 (Bonus): Difference between revisions
Jump to navigation
Jump to search
| Line 29: | Line 29: | ||
=== Portals === | === Portals === | ||
* Don't use any portals to take out the turrets. Close in on them using the cubes as shields. | * Don't use any portals to take out the turrets. Close in on them using the cubes as shields. | ||
* At the last turret, gather up all the cubes and use them to build steps to get you over the barrier. Jump over with a cube to disable the turret | * At the last turret, lean round the edge of the open door and shoot a portal through the two fences onto the tiny visible patch of portal-friendly wall. | ||
* Alternatively you can gather up all the cubes and use them to build steps to get you over the barrier. Jump over with a cube to disable the turret, then use your two portals to get through the final fence. | |||
=== Steps === | === Steps === | ||
Revision as of 11:21, 22 November 2012
 | “I can't get over how small you are!” This article is a stub. As such, it is not complete. You can help Portal wiki by expanding it. |
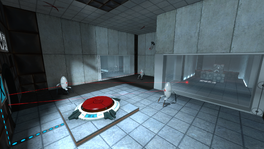
This is the fourth Bonus map of the game. It is unlocked when the original Test Chamber 16 has been completed.
Hazards
Strategy
Portals
- Don't use any portals to take out the turrets. Close in on them using the cubes as shields.
- At the last turret, lean round the edge of the open door and shoot a portal through the two fences onto the tiny visible patch of portal-friendly wall.
- Alternatively you can gather up all the cubes and use them to build steps to get you over the barrier. Jump over with a cube to disable the turret, then use your two portals to get through the final fence.
Steps
-To do-
Time
-To do-
Award requirements
| Portals | Steps | Time | ||||||
|---|---|---|---|---|---|---|---|---|
| Bronze | Silver | Gold | Bronze | Silver | Gold | Bronze | Silver | Gold |
| 9 Portals | 4 Portals | 2 Portals | 70 Steps | 55 Steps | 40 Steps | 70 Seconds | 60 Seconds | 52 Seconds |


