Portal 2 Chapter 4 Test Chamber 21 (Escape): Difference between revisions
Jump to navigation
Jump to search


(I made the spoiler area bigger.) |
No edit summary |
||
| Line 80: | Line 80: | ||
|File:Portal 2 Chapter 4 Test Chamber 21 temptation.png|alt3=GLaDOS attempts to tempt the player back to testing|GLaDOS attempts to tempt the player back to testing. | |File:Portal 2 Chapter 4 Test Chamber 21 temptation.png|alt3=GLaDOS attempts to tempt the player back to testing|GLaDOS attempts to tempt the player back to testing. | ||
}} | }} | ||
{{clr}} | |||
{{Chamber infobox | |||
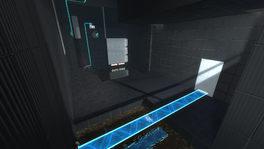
| title = Chapter 4 - Part 5: Escaping the Test | |||
| map = sp_a2_bts2.bsp | |||
| screenshot = Portal 2 Chapter 4 Test Chamber 21 escape.png | |||
| number = 02 | |||
| total = 04 | |||
| icon1 = light bridge | |||
| icon2 = laser field | |||
| icon3 = water hazard on | |||
| icon4 = cube dispenser on | |||
| icon5 = cube button on | |||
| icon6 = crusher hazard on | |||
| icon7 = laser redirection | |||
| icon8 = dirty water on | |||
| icon9 = turret hazard on | |||
| icon10 = cube hazard on | |||
{{TestChambersNav}} | {{TestChambersNav}} | ||
[[Category:Portal_2_chambers]] | [[Category:Portal_2_chambers]] | ||
Revision as of 15:51, 25 October 2021
 | “I can't get over how small you are!” This article is a stub. As such, it is not complete. You can help Portal wiki by expanding it. |
Chapter 4 - Test Chamber 21
sp_a2_bts1.bsp / sp_a2_bts2.bsp Jail Break / Escape

This is the thirtieth level of the game, and the final part of Chapter 4. This level is set within a Test Chamber and the maintenance areas of the Aperture Science facility. This level advances the central plot, and does not contain any significant Portal-related challenges.
Hazards
Walkthrough
Intended Chamber Solution
- Place a portal on the wall where the Hard Light Bridge ends and the other one on the left side of the exit.
- Go through the portal and push the Switch.
- Continue to walk to the cube.
- Put the cube on the button.
- Use the portal again to proceed to the chamber lock.
Actual Course of Action
- Wait for Wheatley to open the wall and run to the Maintenance area.
- Run to the left and continue forwards.
- Turn right on just before the catwalk ends.
- Turn left and jump down. Continue by to the right up the stairs.
- Run forward as much as you can. Turn left and continue running.
- Jump down on the left side.
- Use the Bridge and run away from the Chamber until the Bridge disappears.
- Turn to the opposite direction and continue running.
- Jump from the catwalk to the area between chambers and run forward until you get to the wall.
- Pick up the turret and knock over the turret behind it.
- Turn left and go behind the tube and knock over the third turret.
- Let go off the turret (make sure it gets knocked over).
- Open a portal on the wall near the third turret. Shoot the other portal behind the panels where the third turret is. Go through the portal.
- Run to the right and follow Wheatley until a turret is revealed on the left.
- Get rid of the turret by using a portal and continue following Wheatley. Enter the elevator at the end of the catwalk.
- Wait for the elevator to stop and go through the door.
Video walkthrough
Download demo files: ![]() Part 1 –
Part 1 – ![]() Part 2
Part 2
Related achievements
 |
SaBOTour Make a break for it |
 |
Good Listener Take GLaDOS' escape advice |
Trivia
- If you take too long to escape the test chamber, GLaDOS will fill the room with neurotoxin.
- If you fall for GLaDOS's attempt to trick you back into testing, she traps you and fills the room with neurotoxin.
Music
An Accent Beyond by Aperture Science Psychoacoustics Laboratory [2:58] | ![]() Download |
Download | ![]() Play
Play
Gallery
|


{{Chamber infobox
 | title      = Chapter 4 - Part 5: Escaping the Test
 | map        = sp_a2_bts2.bsp
 | screenshot = Portal 2 Chapter 4 Test Chamber 21 escape.png
 | number     = 02
 | total     = 04
 | icon1      = light bridge
 | icon2      = laser field
 | icon3      = water hazard on
 | icon4      = cube dispenser on
 | icon5      = cube button on
 | icon6      = crusher hazard on
 | icon7      = laser redirection
 | icon8      = dirty water on
 | icon9      = turret hazard on
 | icon10     = cube hazard on