Portal: Prelude Test Chamber 15: Difference between revisions
Jump to navigation
Jump to search
No edit summary |
|||
| (11 intermediate revisions by 4 users not shown) | |||
| Line 1: | Line 1: | ||
This [[Test Chamber]] is the sixteenth level of the game, and introduces the players to Portal Inquisition Fields and maintenance areas. | |||
{{stub}} | {{stub}} | ||
{{Chamber infobox | {{Chamber infobox | ||
| title = Test Chamber 15 | | title = Test Chamber 15 | ||
| valve-title= Mind Maze | | valve-title= Mind Maze | ||
| map = level_05.bsp | | map = level_05.bsp | ||
| number = 15 | | number = 15 | ||
| Line 24: | Line 26: | ||
| icon15 = cake | | icon15 = cake | ||
| previous = Portal: Prelude Test Chamber 14 | | previous = Portal: Prelude Test Chamber 14 | ||
}} | |||
{{clr}} | |||
{{Chamber infobox | |||
| title = Maintenance Area | |||
| valve-title= Wargame | |||
| map = level_05.bsp | |||
| screenshot = Portal Prelude bts.png | |||
| icon1 = cube dispenser | |||
| icon2 = cube hazard | |||
| icon3 = pellet hazard | |||
| icon4 = pellet catcher | |||
| icon5 = water hazard | |||
| icon6 = fling enter | |||
| icon7 = fling exit | |||
| icon8 = turret hazard on | |||
| icon9 = dirty water | |||
| icon10 = empty | |||
| icon11 = empty | |||
| icon12 = empty | |||
| icon13 = empty | |||
| icon14 = empty | |||
| icon15 = cake | |||
| next = Portal: Prelude Test Chamber 16 | | next = Portal: Prelude Test Chamber 16 | ||
}} | }} | ||
== Hazards == | == Hazards == | ||
| Line 39: | Line 62: | ||
== Walkthrough == | == Walkthrough == | ||
{{Spoiler|block=yes| | {{Spoiler|block=yes| | ||
=== Test Chamber 15 === | |||
* Put the [[Weighted Storage Cube]] on the [[Heavy Duty Super-Colliding Super Button|button]], then go to the [[Switch]] behind the moving panel over the ledge. | * Put the [[Weighted Storage Cube]] on the [[Heavy Duty Super-Colliding Super Button|button]], then go to the [[Switch]] behind the moving panel over the ledge. | ||
* Place portals next to the two other Switches and prepare yourself for the timed puzzle. | * Place portals next to the two other Switches and prepare yourself for the timed puzzle. | ||
| Line 46: | Line 71: | ||
* Do the reverse course with the cube. '''This cube mustn't touch any Electricity Field or get crushed. | * Do the reverse course with the cube. '''This cube mustn't touch any Electricity Field or get crushed. | ||
* Place the cube on one of the two empty buttons, then go on the last one. | * Place the cube on one of the two empty buttons, then go on the last one. | ||
* | * Try not to get crushed by the descending ceiling pistons. Exclusive to the ''[[Portal with RTX]]''. | ||
=== While exiting the Shaft === | |||
* Use the path that Peter opens. You are now in the maintenance areas. | |||
* Shoot a portal on the angled panel and the other near you then go through. Before touching the ground, place the same portal as the previous under you. | * Shoot a portal on the angled panel and the other near you then go through. Before touching the ground, place the same portal as the previous under you. | ||
* With the momentum you gained, you should reach the upper floor facing the angled panel. Take the cube and come back at the bottom. | * With the momentum you gained, you should reach the upper floor facing the angled panel. Take the cube and come back at the bottom. | ||
| Line 67: | Line 95: | ||
== See also == | == See also == | ||
* [[Portal: Prelude Test Chamber 15 (Bonus)]] | * [[Portal: Prelude Test Chamber 15 (Bonus)]] | ||
* [[Portal Escape (Part 3)]] | |||
{{ModTestChambersNav}} | {{ModTestChambersNav}} | ||
[[Category:Portal: Prelude chambers]] | [[Category:Portal: Prelude chambers]] | ||
Latest revision as of 01:48, 26 April 2024
This Test Chamber is the sixteenth level of the game, and introduces the players to Portal Inquisition Fields and maintenance areas.
 | “I can't get over how small you are!” This article is a stub. As such, it is not complete. You can help Portal wiki by expanding it. |
Hazards
- High Energy Pellets
- Electricity Fields
- Portal Inquisition Fields
- Crushing
- Cube Hazard
- Turrets
Walkthrough
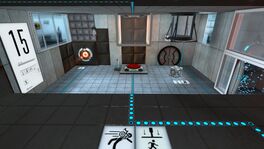
Test Chamber 15
- Put the Weighted Storage Cube on the button, then go to the Switch behind the moving panel over the ledge.
- Place portals next to the two other Switches and prepare yourself for the timed puzzle.
- Quickly, press the Switch next to you, then the one on the other side of the ledge and pas through the portal to activate the last Switch. Then fire a portal behind and facing the Material Emancipation Grill, and the other where the High Energy Pellet is bouncing.
- The pellet should reach the catcher. Now, grab the cube and proceed to the next room. Place the cube on one of the three buttons.
- Go through the Portal Inquisition Field and cross the obstacle course, avoiding to be crushed as well as the Electricity Fields, in order to reach the cube.
- Do the reverse course with the cube. This cube mustn't touch any Electricity Field or get crushed.
- Place the cube on one of the two empty buttons, then go on the last one.
- Try not to get crushed by the descending ceiling pistons. Exclusive to the Portal with RTX.
While exiting the Shaft
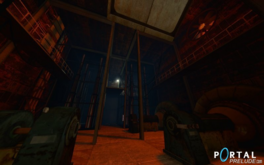
- Use the path that Peter opens. You are now in the maintenance areas.
- Shoot a portal on the angled panel and the other near you then go through. Before touching the ground, place the same portal as the previous under you.
- With the momentum you gained, you should reach the upper floor facing the angled panel. Take the cube and come back at the bottom.
- Put the first portal in the alcove and go through the other portal with the cube. Use the two cubes as stairs to reach the hole above the alcove.
- Knock out the Turrets carefully using portals, then go to the door at the bottom of the room.
- Quickly, open the door, move forward, take the turret and vaporize it with the Material Emancipation Grill.
- Go in the lift and push the little red button.
Video walkthough
Trivia
- The maintenance area that the player visits was already in the original Portal.
Music
11. Atmosphere 2 - 1:08 by ERH
15. Atmosphere String 1 - 2:02 by ERH
See also
| |||||||||||||||||||||||||||||||||||||||||||||||||||||||||||||||||||||||||||||||||||||||


