This [[Test Chamber]] is the first test chamber of the game and introduces the player to [[Goo]].
This chamber has the [[Repulsion Gel]] and the [[Cleansing Gel]] and advanced Portal jumping.
== Hazards ==
== Hazards ==
* [[High Energy Pellet]]s
* Falling to Death
* [[Goo]]
* [[Death Fizzler]]
== Walkthrough ==
== Walkthrough ==
{{Spoiler|block=yes|
===Story Mode===
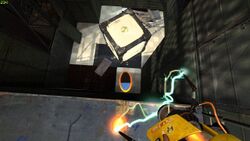
* Place a portal at the location the High Energy Pellet strikes the wall (marked by a circular piece of scorched wall).
====Chamber Part 1====
* Place a portal in front of the High Energy Pellet Catcher (marked by an orange light) when the pellet has passed through your original portal.
* Go up the stairs to the left to get to where the [[Gels]] are falling.
* Place a portal on a nearby wall and pass through it.
* Place a portal underneath the [[Repulsion Gel]].
* Whilst standing on the platform near the orange portal, shoot your portal above the [[Unstationary Scaffold]].
* Walk back down the stairs and toward the [[Repulsion Gel]] poster and turn right.
* When the scaffold is underneath your portal, pass through the orange portal.
* Place your second portal on the ceiling to cover the floor in [[Repulsion Gel]].
* Wait for the scaffold to reach the other end.
* Press the [[Pedestal Button]] to drop a [[Cube]] on the raised platform.
* Walk onto the platform reaching towards the [[Chamberlock]].
* Jump up to the raised platform with the [[Repulsion Gel]] and take the [[Cube]] down.
* Proceed into the Chamberlock.
* Walk to the edge of the pit across from the [[Pedestal Button]].
}}
* Move your second portal around the various portal surfaces in the pit to spread [[Repulsion Gel]] over as much of the pit floor as possible.
* Bounce across the pit to the ledge with the second [[Pedestal Button]].
* Press the second [[Pedestal Button]] to disable the [[Death Fizzler]].
* Bounce back across the pit and pick up the [[Cube]].
* Bounce across the pit to the area previously blocked off by the [[Death Fizzler]], making sure to bring the [[Cube]] along.
* Place your second portal on the slanted portal surface above you to get more [[Repulsion Gel]] on the floor.
* Place your first portal on the floor portal surface directly below the pit ledge.
* Pick up the [[Cube]] and jump with it into your first portal on the pit floor to fling yourself to the exit.
* Place the [[Cube]] on the [[Heavy Duty Super-Colliding Super Button]] to open the exit door.
====Chamber Part 2====
* Place your first portal on the floor underneath the [[Vital Apparatus Vent]] close to the [[Material Emancipation Grill]].
* Place your second portal on the slanted portal surface.
* Press the [[Pedestal Button]] to drop a [[Cube]] through the portal.
* Stand on the [[Heavy Duty Super-Colliding Super Button]] to temporarily disable the [[Material Emancipation Grill]], allowing the [[Cube]] to fling into the [[Heavy Duty Super-Colliding Super Button]] on the the wall behind it and drop the second [[Cube]].
* Place the second [[Cube]] on the [[Heavy Duty Super-Colliding Super Button]] right as a flung [[Cube]] is fizzled in the [[Material Emancipation Grill]].
* Jump on the [[Victory Lift]] quickly before the second [[Cube]] is fizzled and the [[Victory Lift]] rises.
* Once by the exit door, place your second portal on the floor at the bottom of the ledge.
* Catch the [[Cube]] when it flies up to you from the portal.
* Place the [[Cube]] on the [[Heavy Duty Super-Colliding Super Button]] beside the exit door to open it.
===Advanced Mode===
====Chamber Part 1====
* Walk through the [[Material Emancipation Grill]] to the right.
* Press the [[Pedestal Button]] on the right to drop a [[Cube]] on the raised platform.
* Walk to the edge of the pit beside the [[Pedestal Button]] on the left.
* Place both portals on the pit floor; one directly below you and one beside the platform with the [[Pedestal Button]] on the other side of the pit.
* Jump through the portal to fling yourself up to the other platform.
* Press the [[Pedestal Button]] to disable the [[Death Fizzler]].
* Jump back through the portal to return to the first area.
* Walk back through the [[Material Emancipation Grill]] and up the stairs across from it to where the [[Gels]] are falling.
* Place a portal underneath the [[Repulsion Gel]].
* Walk to the edge of the platform past the [[Cleansing Gel]].
* Place your second portal on the slanted portal surface to your right to get [[Repulsion Gel]] on the floor below it.
* Drop through your first portal, making sure to hold your crouch key so the [[Repulsion Gel]] doesn't bounce you off the platform.
* Move your second portal around the various portal surfaces in the pit to spread [[Repulsion Gel]] over as much of the pit floor as possible.
* Bounce across the pit to the area with the two [[Pedestal Button|Pedestal Buttons]].
* Place your second portal on the ceiling to cover the floor in [[Repulsion Gel]].
* Press the [[Pedestal Button]] on the left to temporarily disable the [[Material Emancipation Grill]] blocking off the raised platform with the [[Cube]].
* Jump up to the raised platform with the [[Repulsion Gel]] and take the [[Cube]] down before the [[Material Emancipation Grill]] turns back on.
* Bounce across the pit to the area previously blocked off by the [[Death Fizzler]], making sure to bring the [[Cube]] along.
* Place a portal on the slanted portal surface above you.
* Place your other portal on the floor portal surface directly below the pit ledge.
* Pick up the [[Cube]] and jump with it into your first portal on the pit floor to fling yourself to the exit.
* Place the [[Cube]] on the [[Heavy Duty Super-Colliding Super Button]] to open the exit door.
====Chamber Part 2====
* Place your first portal on the floor underneath the [[Vital Apparatus Vent]] close to the [[Material Emancipation Grill]].
* Place your second portal on the slanted portal surface.
* Press the [[Pedestal Button]] to drop a [[Cube]] through the portal.
* Stand on the [[Heavy Duty Super-Colliding Super Button]] to temporarily disable the [[Material Emancipation Grill]], allowing the [[Cube]] to fling into the [[Heavy Duty Super-Colliding Super Button]] on the the wall behind it and drop the second [[Cube]].
* Place the second [[Cube]] on the [[Heavy Duty Super-Colliding Super Button]] right as a flung [[Cube]] is fizzled in the [[Material Emancipation Grill]].
* Jump on the [[Victory Lift]] quickly before the second [[Cube]] is fizzled and the [[Victory Lift]] rises.
* Once by the exit door, place your second portal on the floor at the bottom of the ledge.
* Catch the [[Cube]] when it flies up to you from the portal.
* Place the [[Cube]] on the [[Heavy Duty Super-Colliding Super Button]] beside the exit door to open it.
== Video walkthrough ==
== Video walkthrough ==
{{chamber demonstration}}
{{youtube|7fKaHzPFd0M|hd=on}}
== Gallery ==
{{Gallery
|width=192
|height=108
|lines=1
|File:Portal TC 08 - Beta 01.jpg|Pre-release Test Chamber 08
[[File:Mel goat 1.jpg|200px|thumbnail|A goat found in an inaccesible part of this map]]
* A painted "LoneWolf2056" can be found.
* In many inaccessible areas around the maps, stock & un-textured models of goats can be found. According to the developers, goats became a running gag during development, leading to the placement of the models for fun. One of them is found in this chamber.
* The music played during this chamber is known as Testing Begins.
* The second part of this chamber is unchanged between Story Mode and Advanced Mode.
In many inaccessible areas around the maps, stock & un-textured models of goats can be found. According to the developers, goats became a running gag during development, leading to the placement of the models for fun. One of them is found in this chamber.
The music played during this chamber is known as Testing Begins.
The second part of this chamber is unchanged between Story Mode and Advanced Mode.