Aerial Faith Plate: Difference between revisions
No edit summary |
m Reverting vandalism |
||
| (44 intermediate revisions by 22 users not shown) | |||
| Line 1: | Line 1: | ||
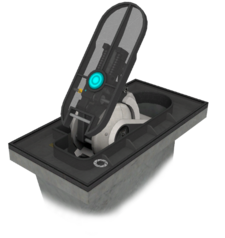
[[File:Faith plate.png|right|225px|thumb|An Aerial Faith Plate in ''Portal 2'']] | [[File:Faith plate.png|right|225px|thumb|An Aerial Faith Plate in ''Portal 2''.]] | ||
{{ | {{Quotation|'''GLaDOS'''|This next test involves the Aperture Science Aerial Faith Plate. It was part of an initiative to investigate how well test subjects could solve problems when they were catapulted into space. Results were highly informative: They could not. Good luck!|sound=GLaDOS_faith_plate_intro01.wav}} | ||
The '''Aerial Faith Plate''' is a mechanism introduced in ''[[Portal 2]]''. This device launches players at a set velocity and height | The '''[[Aperture Science]] Aerial Faith Plate''' ('''Faith Plate''', '''jump pad''' or '''launchpad'''), is a mechanism introduced in ''[[Portal 2]]''. This device launches players over a gap or to a specific destination at a set velocity and height. It can be used in conjunction with [[portals]], and the Plate's ability to preserve the velocity of the user makes it an effective means of travel to far or otherwise inaccessible places. | ||
Aerial Faith Plates can launch any object that is placed on | Aerial Faith Plates can also launch any object that is placed on them. Their mechanism is designed so that the player is launched either directly upward, forward or backward in motion. {{spoiler text|There is one occasion in which an Aerial Faith Plate launches you sideways, during the final chapters of the game.}} | ||
{{ | In [[Portal 2 - Education Version]], the '''Aerial Faith Plate''' can generate an impulse with a specific amount of force (1-99N) and in a precise direction (0-90°). | ||
==Demonstrations== | |||
{{Video gallery | |||
|videohd=yes | |||
|video1=fE3B9uGnVlA | |||
|video2=laxPhiDqTJA | |||
}} | |||
==Chamberlock Video== | |||
{{Youtube|wUe4RMlplrc}} | |||
The Aerial Faith Plate as it appears in a [[Chamberlock#Videos|Chamberlock informational video]]. | |||
== Gallery == | |||
{{Gallery | |||
|lines=2 | |||
|height=125 | |||
|width=200 | |||
|File:Aerial Faith Plate E3 Promo.png|alt1=The promotional image in the E3 Demo|The promotional image in the E3 Demo | |||
}} | |||
== Related Achievements == | |||
=== Portal 2 === | |||
{{Achievement table | |||
| 1 = {{Show achievement|Portal 2|Pturretdactyl}} | |||
}} | |||
== Seen in == | |||
=== Portal 2 single-player chambers === | |||
*[[Portal 2 Chapter 2 Test Chamber 5|Chapter 2 - Test Chamber 05]] (introduced) | |||
*[[Portal 2 Chapter 2 Test Chamber 6|Chapter 2 - Test Chamber 06]] | |||
*[[Portal 2 Chapter 3 Test Chamber 9|Chapter 3 - Test Chamber 09]] | |||
*[[Portal 2 Chapter 3 Test Chamber 10|Chapter 3 - Test Chamber 10]] | |||
*[[Portal 2 Chapter 3 Test Chamber 15|Chapter 3 - Test Chamber 15]] | |||
*[[Portal 2 Chapter 4 Test Chamber 18|Chapter 4 - Test Chamber 18]] | |||
*[[Portal 2 Chapter 4 Test Chamber 19|Chapter 4 - Test Chamber 19]] | |||
*[[Portal 2 Chapter 5 Turret Control Center|Chapter 5 - Turret Control Center]] (used for [[Turret]]s and [[Defective Turret]]s) | |||
*[[Portal 2 Chapter 5 GLaDOS' Lair|Chapter 5 - GLaDOS' Lair]] | |||
*[[Portal 2 Chapter 8 Test Chamber 3|Chapter 8 - Test Chamber 03]] | |||
*[[Portal 2 Chapter 8 Test Chamber 5|Chapter 8 - Test Chamber 05]] | |||
*[[Portal 2 Chapter 8 Test Chamber 6|Chapter 8 - Test Chamber 06]] | |||
*[[Portal 2 Chapter 8 Test Chamber 11|Chapter 8 - Test Chamber 11]] | |||
*[[Portal 2 Chapter 9 Mash-up|Chapter 9 - Mash-up]] | |||
*[[Portal 2 Chapter 9 Holmes Vs Moriarty|Chapter 9 - Holmes vs. Moriarty]] | |||
=== Portal 2 co-op chambers === | |||
* [[Portal 2 Co-op Course 2 Chamber 5|Course 2 - Test Chamber 05]] | |||
* [[Portal 2 Co-op Course 2 Chamber 6|Course 2 - Test Chamber 06]] | |||
* [[Portal 2 Co-op Course 2 Chamber 7|Course 2 - Test Chamber 07]] | |||
* [[Portal 2 Co-op Course 3 Chamber 1|Course 3 - Test Chamber 01]] | |||
* [[Portal 2 Co-op Course 3 Chamber 3|Course 3 - Test Chamber 03]] | |||
* [[Portal 2 Co-op Course 3 Chamber 4|Course 3 - Test Chamber 04]] | |||
* [[Portal 2 Co-op Course 3 Chamber 5|Course 3 - Test Chamber 05]] | |||
* [[Portal 2 Co-op Course 3 Chamber 7|Course 3 - Test Chamber 07]] | |||
* [[Portal 2 Co-op Course 4 Chamber 2|Course 4 - Test Chamber 02]] | |||
* [[Portal 2 Co-op Course 4 Chamber 4|Course 4 - Test Chamber 04]] | |||
* [[Portal 2 Co-op Course 4 Chamber 7|Course 4 - Test Chamber 07]] | |||
* [[Portal 2 Co-op Course 4 Chamber 8|Course 4 - Test Chamber 08]] | |||
* [[Portal 2 Co-op Course 6 Chamber 3|Course 6 - Test Chamber 03]] | |||
* [[Portal 2 Co-op Course 6 Chamber 6|Course 6 - Test Chamber 06]] | |||
{{Portal2MechanicsNav}} | |||
[[Category:Mechanics]] | [[Category:Mechanics]] | ||
Latest revision as of 04:09, 13 June 2023

| “ | This next test involves the Aperture Science Aerial Faith Plate. It was part of an initiative to investigate how well test subjects could solve problems when they were catapulted into space. Results were highly informative: They could not. Good luck!
— GLaDOS
|
” |
The Aperture Science Aerial Faith Plate (Faith Plate, jump pad or launchpad), is a mechanism introduced in Portal 2. This device launches players over a gap or to a specific destination at a set velocity and height. It can be used in conjunction with portals, and the Plate's ability to preserve the velocity of the user makes it an effective means of travel to far or otherwise inaccessible places.
Aerial Faith Plates can also launch any object that is placed on them. Their mechanism is designed so that the player is launched either directly upward, forward or backward in motion. There is one occasion in which an Aerial Faith Plate launches you sideways, during the final chapters of the game.
In Portal 2 - Education Version, the Aerial Faith Plate can generate an impulse with a specific amount of force (1-99N) and in a precise direction (0-90°).
Demonstrations
Chamberlock Video
The Aerial Faith Plate as it appears in a Chamberlock informational video.
Gallery
|
Related Achievements
Portal 2
|
Seen in
Portal 2 single-player chambers
- Chapter 2 - Test Chamber 05 (introduced)
- Chapter 2 - Test Chamber 06
- Chapter 3 - Test Chamber 09
- Chapter 3 - Test Chamber 10
- Chapter 3 - Test Chamber 15
- Chapter 4 - Test Chamber 18
- Chapter 4 - Test Chamber 19
- Chapter 5 - Turret Control Center (used for Turrets and Defective Turrets)
- Chapter 5 - GLaDOS' Lair
- Chapter 8 - Test Chamber 03
- Chapter 8 - Test Chamber 05
- Chapter 8 - Test Chamber 06
- Chapter 8 - Test Chamber 11
- Chapter 9 - Mash-up
- Chapter 9 - Holmes vs. Moriarty
Portal 2 co-op chambers
- Course 2 - Test Chamber 05
- Course 2 - Test Chamber 06
- Course 2 - Test Chamber 07
- Course 3 - Test Chamber 01
- Course 3 - Test Chamber 03
- Course 3 - Test Chamber 04
- Course 3 - Test Chamber 05
- Course 3 - Test Chamber 07
- Course 4 - Test Chamber 02
- Course 4 - Test Chamber 04
- Course 4 - Test Chamber 07
- Course 4 - Test Chamber 08
- Course 6 - Test Chamber 03
- Course 6 - Test Chamber 06

