Chell/zh-hans: Difference between revisions
No edit summary |
No edit summary |
||
| Line 60: | Line 60: | ||
|File:Chell_Valentine.png|alt6=Chell Valentine from Valve's official Portal 2 blog.|Chell的情人节卡片,来自Valve的官方“传送门 2博客”。 | |File:Chell_Valentine.png|alt6=Chell Valentine from Valve's official Portal 2 blog.|Chell的情人节卡片,来自Valve的官方“传送门 2博客”。 | ||
|File:Chell Icon.jpg|alt7=Avatar of Chell from the official Steam Portal 2 group.|Chell的头像,来自[http://steamcommunity.com/games/portal2/Avatar/List official Steam Portal 2 group]. | |File:Chell Icon.jpg|alt7=Avatar of Chell from the official Steam Portal 2 group.|Chell的头像,来自[http://steamcommunity.com/games/portal2/Avatar/List official Steam Portal 2 group]. | ||
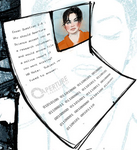
|File:Lab Rat - A Page From Chell's File.png|alt8=One of the pages from Chell's file in Lab Rat.| | |File:Lab Rat - A Page From Chell's File.png|alt8=One of the pages from Chell's file in Lab Rat.|漫画''[[Portal 2: Lab Rat/zh-hans|传送门 2:实验室的老鼠]]'' 中,Chell的档案的其中一页。 | ||
|File:Lab Rat - Ratman With Chell's File.png|alt9=Doug Rattmann holding Chell's file in Lab Rat.|[[Doug Rattmann]] | |File:Lab Rat - Ratman With Chell's File.png|alt9=Doug Rattmann holding Chell's file in Lab Rat.|''实验室的老鼠'' 中,[[Doug Rattmann/zh-hans|Doug Rattmann]]拿着Chell的档案。 | ||
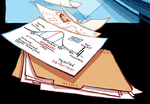
|File:Lab Rat - Chell's File - Stubborn.png|alt10=Chell's file showing her high level of tenacity from the ''Lab Rat'' comic.| | |File:Lab Rat - Chell's File - Stubborn.png|alt10=Chell's file showing her high level of tenacity from the ''Lab Rat'' comic.|来自漫画''实验室的老鼠'',Chell的档案显示她表现出了很强的韧性。 | ||
|File:Lab Rat - Chell's Name on the List.png|alt11=Chell on the test subject list when Rattmann sabotages the list from ''Lab Rat''.| | |File:Lab Rat - Chell's Name on the List.png|alt11=Chell on the test subject list when Rattmann sabotages the list from ''Lab Rat''.|来自''实验室的老鼠'',当Rattmann破坏测试对象名单时,Chell就在那份名单上。 | ||
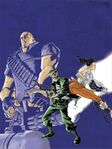
|File:Chell on the Cover of The Sacrifice.png|alt12=The cover of "The Sacrifice" featuring various Valve characters, including Chell.| | |File:Chell on the Cover of The Sacrifice.png|alt12=The cover of "The Sacrifice" featuring various Valve characters, including Chell.|“牺牲”的封面展示了多位Valve角色,包括Chell。 | ||
|File:Full Zoom of Chell on the Cover of The Sacrifice.png|alt13=Full zoom of Chell on the cover of "The Sacrifice".| | |File:Full Zoom of Chell on the Cover of The Sacrifice.png|alt13=Full zoom of Chell on the cover of "The Sacrifice".|“牺牲”的封面上,Chell的全景图, | ||
|File:The_Sacrifice_Concept_Art.jpg|alt14=Concept art for "The Sacrifice".| | |File:The_Sacrifice_Concept_Art.jpg|alt14=Concept art for "The Sacrifice".|“牺牲”的概念艺术。<ref>http://www.destructoid.com/dark-horse-publishing-valve-steam-powered-comic-205623.phtml</ref> | ||
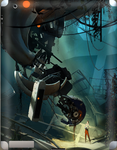
|File:Chell and GLaDOS Gelaskin.png|alt15=Artwork of Chell and GLaDOS on an iPad gelaskin.| | |File:Chell and GLaDOS Gelaskin.png|alt15=Artwork of Chell and GLaDOS on an iPad gelaskin.|iPad保护套上的Chell和[[GLaDOS/zh-hans|GLaDOS]]艺术作品。 | ||
|File:GLaDOS Lithograph Aperture's Requiem.png|alt16=Chell and GLaDOS on the "Aperture's Requiem" lithograph.| | |File:GLaDOS Lithograph Aperture's Requiem.png|alt16=Chell and GLaDOS on the "Aperture's Requiem" lithograph.|平版印刷画,“光圈的安魂曲”上的Chell和[[GLaDOS/zh-hans|GLaDOS]]。 | ||
|File:Red-Nosed P02.jpg|alt17=Chell in the "Randolph the Red-Nosed Turret" comic.|"[[Randolph the Red-Nosed Turret/zh-hans|红鼻子炮塔 Randolph]]" 漫画中的Chell。 | |File:Red-Nosed P02.jpg|alt17=Chell in the "Randolph the Red-Nosed Turret" comic.|"[[Randolph the Red-Nosed Turret/zh-hans|红鼻子炮塔 Randolph]]" 漫画中的Chell。 | ||
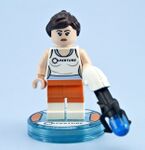
|File:LEGO Minifig Chell.jpg|alt18=LEGO Chell minifig|Chell的乐高小人。 | |File:LEGO Minifig Chell.jpg|alt18=LEGO Chell minifig|Chell的乐高小人。 | ||
| Line 89: | Line 89: | ||
* [[Audiosurf Flag/zh-hans|Audiosurf旗帜]] | * [[Audiosurf Flag/zh-hans|Audiosurf旗帜]] | ||
== | == 参考资料 == | ||
<references/> | <references/> | ||
{{CharactersNav}} | {{CharactersNav}} | ||
Revision as of 17:22, 5 January 2024
| “Estás usando este software de traducción de forma incorrecta. Por favor, consulta el manual. - Wheatley” 本页面正在被翻译为简体中文。 如果您会说简体中文,可以在讨论页面发帖,或通过查看页面历史记录,来与那些为该页面做出贡献的人交谈。 |
| “ | ” |
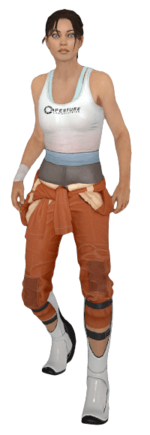
Chell,被记录为测试对象 #1(在之前被记录为#1498)[1] ,是光圈科技计算机辅助丰富学习中心的一个测试对象,并且参与了公司的手持传送门装置(通常被称为传送枪)的测试.
她是 传送门 和 传送门 2 单人模式中的沉默的主角。除了她可能在出生时被遗弃以及她顽强的求生意志之外,我们对她的过去知之甚少。
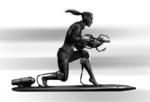
在整个系列中,Chell 在她的测试课程中被AI设施监督 GLaDOS 所敌对。 Chell 能使用的仅有手持传送门装置,而她最终利用这个装置避开危险,绕过设施的各个部分以逃生。
根据一条时间线,Chell 很可能有由她的DNA制作而成的没有灵魂的克隆体。[2]
概述
Chell 的大部分过去仍然是个谜。在 传送门 故事的最后,GLaDOS 多次提及 Chell 在出生时被遗弃,还提到她被领养,尽管 GLaDOS 的话可信度不明,但这些提及在 传送门 2 中仍然存在。GLaDOS 在 传送门 2 和 传送门 后期的许多评论都是为了贬低、烦扰或分散 Chell 实现目标的注意力,而关于她被领养和孤儿身份的陈述是否属实还有待讨论。
在 传送门 2 的故事中,有迹象表明 Chell 可能是一位在光圈科技工作的科学家的女儿。
传送门
在 GLaDOS 接管光圈科技后的某个时刻,Chell 在一个放松保险仓中被唤醒,此前她被无意识地放置在其中。出于好奇,她探索了保险仓,而在醒来后不到十秒钟,Chell 被一个似乎是自动播放的机械女声欢迎,告知她是一个测试对象。那个声音(后来被揭示为 GLaDOS)随后声明,为了光圈科技的研究计划,Chell 将接受测试。
然后,GLaDOS 在一个纯色平面上生成了两个椭圆形的传送结构(传送门),其中一个入口传送门位于放松保险仓内,另一个出口位于仓外正前方。Chell 离开了保险仓,但她注意到空旷的观察室内缺少应该记录她表现的工作人员。在完成她的第一个测试并理解了方块和按钮的基本机制后,她被安排了一系列测试,以进一步探索和理解传送门的使用。
Having completed two tests, Chell reaches a test chamber in which she acquires the Portal Gun. Later on during the testing course, she is put through a series of more dangerous tests including hazards such as Goo/zh-hans and High Energy Pellet/zh-hanss, among others. Skillfully avoiding these hazards, Chell is assisted by the Companion Cube/zh-hans and by the Aperture Science Advanced Knee Replacement components applied to the back of her lower legs to her ankles, which allow Chell to avoid injury when falling from great heights. Eventually, the single-portal variant of her Portal Gun is upgraded to create a set of linked portals. As an incentive to complete the tests, GLaDOS/zh-hans promises Chell that cake will be served once all tests chambers have been completed.
As the testing progresses, Chell stumbles across various areas with defunct wall panels, and manages to sneak into them. As she enters these maintenance areas, she finds refuge areas commonly known as the Rat Man/zh-hans|'s Dens, previously used as hiding places by Aperture technician Doug Rattmann. The scribblings on the walls in these Dens appear to be warnings for Chell, telling her that "the cake is a lie" and that "she's watching you". Chell, now made more aware of her situation, is forced to continue testing and play along with GLaDOS' plans. The Rat Man's warnings are eventually revealed to be correct, as GLaDOS attempts to murder Chell upon her completion of the final test chamber, despite earlier promises of cake.
Chell successfully escapes the dramatically slow death trap, and is informed by GLaDOS that pretending to kill Chell is simply part of the test. Dubious as to the veracity of this claim, Chell escapes the testing course, and travels through the Aperture Science Facility in an attempt to reach the surface and escape. Eventually however, Chell realizes there there is no chance of escape as long as GLaDOS is in control of the Facility, and is forced to confront GLaDOS in the 中央AI实验室.
Upon entry to the chamber, Chell is greeted by the passive-aggressive rogue AI. GLaDOS claims that she will provide Chell with a surprise, however a Morality Core unexpectedly detaches from GLaDOS' chassis. Chell destroys it using a nearby Emergency Intelligence Incinerator/zh-hans, however the Core is revealed to be a safeguard designed to inhibit GLaDOS' homicidal tendencies. With the Core destroyed, GLaDOS releases 神经毒素 into the chamber in an attempt to kill Chell. At the same time, a Rocket Turret emerges from a core hatch beside GLaDOS and begins to target Chell. Using the Portal Gun, Chell redirects the projectiles through linked portals, causing the rockets to strike GLaDOS, each of which detaches more Personality Cores from the chassis. Although inflicting damage, the loss of the Cores merely increases GLaDOS's desire to kill Chell. After destroying each detached Core one-by-one, Chell destroys the final Core (the Anger Core), and GLaDOS is sent literally spiraling into her demise, as the destruction of her generators triggers a gravitational vortex, which deposits Chell on the surface.
Chell slowly regains consciousness in the parking lot of the Enrichment Center, with with a lifeless GLaDOS beside her. As Chell's vision clears, the 派对护送机器人 thanks her for "assuming the party escort submission position", and begins dragging her back into the now-ruined Aperture Science Facility. As Chell is dragged away, it is revealed that the destruction of the Central Core (GLaDOS) resulted in the automatic activation of other Personality Cores, tasked with the management of the Enrichment Center while GLaDOS is offline. The final scene depicts the Companion Cube and a cake deep within the bowels Facility, waiting for Chell to claim them.
实验室的老鼠
During the course of the comic, we are introduced to former Aperture scientist, Doug Rattman. He witnesses the apparent destruction of GLaDOS, and later, after escaping from the facility himself, witnesses the recapturing of Chell by the Party Escort Robot. Following the robot, he finds that Chell has been placed into an 扩展休闲中心. However, as a result of the explosion at the conclusion of Portal, all of the relaxation vaults' life support systems are offline. Doug patches Chell's vault onto a reserve grid (as he was unable to open the vault), allowing Chell to survive the years prior to her reawakening in Portal 2.
传送门 2
Many years after the events of the original games, Chell is revived by Wheatley/zh-hans, a 人格核心. After a brief introduction, he convinces Chell to escape with him from the ruined facility. The pair eventually find themselves in the remains of GLaDOS' chamber. Wheatley then inadvertently reawakens GLaDOS, who immediately recognizes Chell. Discarding Wheatley, GLaDOS plunges Chell back into the depths of Aperture, to resume testing.
Chell finds herself testing in the ruined facility with GLaDOS, but after a several chambers, Wheatley rescues Chell to help him sabotage GLaDOS' weaponry, allowing for a coup to take place later. GLaDOS eventually manages to trap Chell and bring her into her lair. After finding that her preferred methods of murder are unusable, Chell and GLaDOS find themselves at a standstill. Wheatley reappears, and after Chell initiates a core transfer, replaces GLaDOS as the Central AI of Aperture. However, he goes mad with power, dismantles the remains of GLaDOS' head and reconfigures it into a potato battery, and accidentally sends both GLaDOS and Chell to the decomposing underbelly of the facility, "Old Aperture," which had been sealed off for many decades.
In Old Aperture, Chell is introduced to Cave Johnson/zh-hans, the now-deceased founder and CEO of Aperture and his assistant Caroline. Throughout the tests, Chell finds and re-activates the Repulsion, Propulsion and Conversion Gels. She is reunited with GLaDOS during her travel through Old Aperture, and the two forge a plot to overthrow Wheatley in exchange for Chell's freedom.
After departing from Old Aperture, the duo locate a test chamber that Wheatley is overseeing and attempt to disable him via a logical paradox. This fails, however, and they quickly find themselves solving Wheatley's own cobbled-together tests. Much like in the first game, Wheatley tries to kill Chell and GLaDOS, saying that he had found the perfect replacements for Chell. After a lengthy chase through the upper facility, Chell and GLaDOS are again in the Central AI Chamber with Wheatley. Chell furthers Wheatley's "corruption" by attaching corrupted cores to his frame, allowing for a second core transfer. Before Chell can do this, however, Wheatley detonates bombs that he had "booby-trapped the stalemate button" with in a last ditch effort to maintain control. However, Chell fires one last set of portals above and below Wheatley. These portals link together the Moon and the Central AI Chamber, and both Chell and Wheatley are sucked through into outer space. Seconds afterword, GLaDOS regains control of her chassis, rescues Chell, and closes the portals, leaving Wheatley to be lost in space. After a monologue, GLaDOS (supposedly) makes good on her promise, and delivers Chell, via high-speed elevator, to the surface above Aperture Science. As the elevator ascends, it enters an ampitheatre-like space, where a choir of turrets sing a farewell song to Chell. Chell's elevator emerges in a shed in a large field of wheat. Chell's Companion Cube is also sent up moments afterword, presumably as a token of "thank you" from GLaDOS. After expelling the Companion Cube, the elevator door slams violently, probably to indicate that GLaDOS does not want Chell to return to the Enrichment Center again.
画廊
| Chell | ||||||||||||||||||||||||||||||||||
| ||||||||||||||||||||||||||||||||||
琐事
- 在 传送门 2 中的“带女儿上班日”的科学展览中,其中一个项目有着“by Chell”的签名,表明 Chell 是一位光圈科技员工的女儿。这个项目看起来起初是一个土豆,在与“爸爸工作中的一个元素”互相作用后,现在已经失控地大量生长,并在建筑中扎下了根。GLaDOS 在最初的 传送门 的第三个实验室的末尾也暗示了这一点,她说:“做得好,记住,‘光圈科技带女儿上班日’是让她接受测试的完美时机。” 以及在第六个实验室中她说:“难以置信。你,「在此处填写受试者姓名」,一定是「在此处填写受试者家乡」的骄傲。”
- Chell 的模型是根据女演员 Alésia Glidewell 设计的,似乎是白种欧洲人和东亚或东南亚人的混血儿,有着深色头发和蓝眼睛。
- 在 传送门 中,Chell 有时会在受伤时发出小小的尖叫声。然而,这些声音片段只是半衰期 2中的女性市民的档案录音,她们由 Mary Kae Irvin 配音。这后来成为 传送门 2 中受到追溯修订的众多事项之一,因为 Chell 不再发出任何疼痛呻吟。
- Chell 曾经是合作模式中出现的二号合作对象。她在开发初期被 P-Body 所取代。
- 在最初的结局演出中,僵局解决按钮将被 Wheatley 摧毁,在这段演出中,系统广播会说,如果僵持解决助理说“是的”,僵持就会被解决。在按下按钮时,会导致一次黑屏,而 Chell 会说“是的”。这个演出被删掉了,因为游戏测试人员发现很难找出到底是谁在说是。 [4]
- Chell 与其他几个 传送门 2 角色一起出现在乐高次元/维度的 传送门 2 关卡包 中。
- GLaDOS 向 Chell 表示,她在低温储藏室里找到了两个和她姓氏相同的测试对象,暗示她的父母可能曾在光圈工作,并且没有在“带女儿上班日”的灾难中丧生。
- 尽管 Chell 是玩家扮演的角色,但在传送门或传送门 2中,她的名字几乎从未被提及,这可能是为了增加玩家的代入感。
也可以看看
参考资料
| ||||||||||||||

