Puzzle Creator/ko: Difference between revisions
Ysjbserver (talk | contribs) mNo edit summary |
m fail |
||
| (2 intermediate revisions by 2 users not shown) | |||
| Line 3: | Line 3: | ||
'''퍼즐 제작툴''' (또는 '''퍼즐 메이커''' 또는 '''맵 에디터''' 라고도 합니다.) 은 ''[[Portal 2/ko|포털 2]]'' 의 2012년 | '''퍼즐 제작툴''' (또는 '''퍼즐 메이커''' 또는 '''맵 에디터''' 라고도 합니다.) 은 ''[[Portal 2/ko|포털 2]]'' 의 2012년 5월 8일 [[Perpetual Testing Initiative/ko|궁극적 실험 계획]] DLC의 업데이트에서 추가된것입니다.<ref name="shacknews_editor_confirmed"/> 퍼즐 제작툴은 싱글용 또는 [[Co-op/ko|협동]]용 테스트를 간단하게 게임 안에서 제작할 수 있습니다.<ref name="shacknews_editor_confirmed">[http://www.shacknews.com/article/70740/portal-2-in-game-map-editor-confirmed ShackNews article ''Portal 2 in-game map editor confirmed''] accessed 22 October 2011</ref> | ||
만약 협동용 테스트를 만들고자 하면, 반드시 "협동용 퍼즐" 을 "파일" 메뉴에서 체크해야합니다. | 만약 협동용 테스트를 만들고자 하면, 반드시 "협동용 퍼즐" 을 "파일" 메뉴에서 체크해야합니다. | ||
| Line 264: | Line 264: | ||
{{Portal Series}} | {{Portal Series}} | ||
[[Category:Puzzle Creator]] | [[Category:Puzzle Creator/ko]] | ||
Latest revision as of 09:45, 18 January 2016
| “당신은 잘못된 번역 소프트웨어를 사용하고 있습니다. 사용 설명서를 참고해 주시기 바랍니다. - 휘틀리” 이 페이지는 Korean 어로 번역 중에 있습니다. Korean어로 번역을 도와주실 수 있다면, 토론 페이지를 이용하여 함께 번역을 끝내주십시오. (마지막으로 수정한 사람을 보려면 문서 역사 페이지에서 확인하십시오.) |
퍼즐 제작툴 (또는 퍼즐 메이커 또는 맵 에디터 라고도 합니다.) 은 포털 2 의 2012년 5월 8일 궁극적 실험 계획 DLC의 업데이트에서 추가된것입니다.[1] 퍼즐 제작툴은 싱글용 또는 협동용 테스트를 간단하게 게임 안에서 제작할 수 있습니다.[1]
만약 협동용 테스트를 만들고자 하면, 반드시 "협동용 퍼즐" 을 "파일" 메뉴에서 체크해야합니다.
개요
에디터가 처음 언급된것은 Portal 2 - The Final Hours 였습니다. "당시 Valve는 포털 2의 맵을 쉽고 빠르게 만드는 방법을 연구중에 있었습니다. 결국 고민끝에 간단하게 제작할 수 있는 레벨에디터를 만들기로 했습니다.".[2]
"퍼즐 제작툴"은 전혀 공식적인 이름 같지가 않아보이지만 Valve는 결국 2011년 10월 27일에 "퍼즐 제작툴"을 채택 하였다고 합니다[3], 그후 2012년 4월 27일 "퍼즐 제작툴"이 완성되었습니다.[4] "퍼즐 제작툴"은 편하게 게임에서 테스트를 만들수 있습니다.
인터페이스
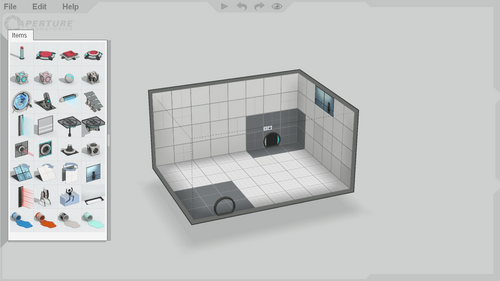
퍼즐 제작툴의 전체적인 텍스쳐는 깔끔하며, 실제 테스트실이 우리앞에 있는 것 같은 느낌을 줍니다.

기본 조작법
- 마우스를 왼쪽에 갖다대면 아이템 리스트가 떠 아이템을 배치할수있습니다.
- 화면의 상단의 버튼은 각각 다음과 같습니다.: "제작후 퍼즐 해보기", "되돌리기", "되돌린것을 복귀하기", 그리고"게임뷰로 전환하기".
- 화면의 오른쪽 상단에 마우스를 갖다대면 카메라의 시선을 움직일수 있습니다.
- 화면의 오른쪽에 마우스를 갖다대면 카메라를 확대/축소 할수있습니다.
- 화면의 오른쪽 하단에 마우스를 갖다대면 카메라를 회전시킬수 있습니다.
 - 아이템이나 블록을 지정합니다.
 - 배경에서:카메라 움직이기; 테스트에서: 설정 메뉴.
 - 클릭: 카메라 회전.; 스크롤: 카메라 확대/축소.
- W+S - 확대/축소.
- Q+E - 왼쪽 또는 오른쪽으로 회전.
- W+S - 왼쪽 또는 오른쪽으로 이동.
- R+F - 위 또는 아래로 회전.
- P - 포털 설치 가능/불가능 구역 지정.
- ++- - 벽을 밀거나 채웁니다.
- Delete/← Backspace - 아이템을 제거합니다.
고급 사용자용 컨트롤
- ⇧ Shift+
 - 한쪽 면 전체를 선택합니다.
 - ctrl+
 - 아이템을 복사합니다. (어떤것들은 복사가 안될수있습니다.)
 - alt+
 - 카메라에서 보이지 않는 면으로 아이템을 이동시킵니다.
 - space+
 - 한쪽면 전체를 채우거나 밀어버립니다.
단축키
- ctrl+N - 새 테스트
- ctrl+O - 열기...
- ctrl+S - 저장
- ctrl+⇧ Shift+S - 다른이름으로 저장...
- Tab ⇆ - 게임뷰로 전환.
- F9 - 다시 제작
- ctrl+Q - 제작툴에서 나가기
- ctrl+Z - 되돌리기
- ctrl+Y - 되돌린것을 다시 되돌리기
- ctrl+A - 전부 선택하기
아이템 리스트
 스위치 (타이머 포함)
 수퍼 버튼
수퍼 버튼 큐브용 버튼
 공큐브용 버튼
 중형 큐브 (드롭퍼 포함)
 동행 큐브 (드롭퍼 포함)
 공모양 안전 큐브 (드롭퍼 포함)
 프랑켄 터릿 큐브 (드롭퍼 포함)
 유도 터널 (반대 방향 포함)
 신뢰 발판
신뢰 발판 하드 라이트 브릿지
 (패널)계단
 피즐러
피즐러 유리 (늘리거나 돌릴수 있습니다.)
 피스톤 플랫폼
 트랙 플랫폼
 레이저 발사기.
 레이저 캐처.
 레이저 릴레이.
 굴절 큐브 (드롭퍼 포함)
 유리 패널
유리 패널 패널
패널 돌림 패널
돌림 패널 관찰실
관찰실 레이저 필드
 터릿
터릿 독성 물질
독성 물질 형광등
형광등 반발젤 (드롭퍼 포함)
 가속 젤 (드롭퍼 포함)
 변환 젤 (드롭퍼 포함)
 세척액 (드롭퍼 포함)
 문 (각 테스트에 2개 밖에 없으며 새로 배치할수 없습니다.)
교육용 버전용
힌트
처음 하는사람들의 힌트
- 실험실 표면을 선택하기 위해 타일을 클릭하세요.
- 여러 표면을 거처 선택하시면 볼륨을 선택할 수 있습니다.
- 선택한 표면에 오른쪽 마우스를 누르셔서 포탈 사용 가능 여부를 정하세요.
- 선택된 표면 끝을 잡아 당겨서 표면을 옮기세요.
- 배경을 끌어서 카메라를 회전하세요.
- 팔레트에서 아이템을 추가하기 위해 마우스를 화면 왼쪽 끝으로 옮기세요.
초보자 힌트
- 아이템에 오른쪽 마우스를 누르셔서 아이템 속성을 변경하시거나 다른 아이템과 연결하세요.
- 모든 실험실에는 정해진 아이템인 입구, 출구, 관찰실이 있어야 합니다. 이 아이템들은 추가, 삭제 그리고 복사할 수 없습니다.
- '+' 그리고 '-'키를 사용하셔서 표면을 밀고 당기세요.
- P'키를 사용하여 선택한 표면에 포탈 사용가능여부를 정하십시오.
- 마우스를 화면 오른쪽 끝으로 가져와서 카메라를 이동, 확대, 그리고 회전을 하세요.
- 카메라를 회전해서 천장에 작업을 하세요.
- 퍼즐 아이템을 더욱더 빠르게 복사하기 위해 CTRL을 누르시고 옮기세요.
- 화면을 확대/축소하기 위해 마우스 스크롤 휠을 사용하세요.
- 어느 아이템들은 배치한 자리와 호환되지 않아 고쳐질 때까지 오류가 나옵니다.
- 표면에 있는 아이템의 위치를 변경하기 위해 아이템을 클릭하시고 조정하세요.
Early intermediate
- Use the adjustment gizmo that appears when you click an item to reposition it on its surface.
- Double click a surface to automatically expand the selection around all adjacent coplanar surfaces.
- Block-select surfaces on different planes to select a volume.
- Look for hotkey shortcuts along the right side of menus.
- The large mandatory observation room emits a bright light that casts shadows. Position it to enhance the visual effect of your chamber.
- Are your puzzles too dark? Use small observation room and light strip items to control the illumination level throughout your chamber.
- Press and drag the middle mouse wheel/button to rotate the camera view.
- The icons along the left side of a context menu are buttons that can be used repeatedly while the menu is open.
- Press and drag the middle mouse wheel/button while holding down ⇧ Shift to pan the camera view.
- With a volume selected, the + and - keys will fill or carve.
- Press and drag the right mouse button to rotate the camera view.
- Drag the boundary of a volume selection set to move a portion of your chamber along any 3D axis.
Intermediate
- Connect multiple buttons to a receiving item: This requires all to be pressed simultaneously for activation.
- Hold down the spacebar and drag anywhere to quickly move selected surfaces and volumes.
- Use Home key to reset the camera view.
- Press F9 to rebuild and run your puzzle.
- Use W, A, S, D keys to move the camera view.
- Use the Q E and R F keys to rotate the camera view.
- Press the O key to invert the portalability of selected surfaces
- Connect items together quickly by selecting one and using the K key.
- Hold down Alt while moving items to keep them on surfaces facing away from the camera view.
- Hold down ⇧ Shift while rotating turrets and dropper-less cubes to snap their orientation to 45 degree increments.
Advanced
- When previewing your puzzle in first-person mode, use the 'noclip' console command to quickly navigate the chamber.
- Place up to 4 light strips on a surface by using their adjustment gizmo.
- Change glass to grating by right clicking and changing the barrier type.
- Drag a trajectory target back onto its faith plate to create a vertical launch.
- Create a pre-placed paint splat by deleting or disabling the associated dropper.
Limitations
As the puzzle creator is designed for ease of use, certain limitations apply. These limitations can be overcome by importing the map into Hammer in the Portal 2 Authoring Tools.
- The entity limit is set to 1750; the actual number of items placeable by the user is much lower than this.
- The editor is block based, so complex geometry such as curves and angles smaller or greater than 90 degrees cannot be achieved.
- Chambers are isolated, so sequences of chambers cannot be published as one map using the Puzzle Creator alone.
Related commands
procedural_generator_solve_it- Solve the procedural puzzle generator.procedural_generator_test- Test the procedural puzzle generator.puzzlemaker_autosave_dev- autosaves the current puzzle as 'autosave.p2c'puzzlemaker_compile_and_previewpuzzlemaker_compile_and_publishpuzzlemaker_current_hintpuzzlemaker_drawselectionmeshes 0/1- draw wireframe item selection meshes in redpuzzlemaker_export <name>- export the current puzzle as 'name.vmf' (maps are saved to common\portal 2\sdk_content\maps\)puzzlemaker_load_dev- load the puzzle called 'name.p2c'puzzlemaker_new_chamberpuzzlemaker_open_chamberpuzzlemaker_play_sounds 0/1- sets if the puzzlemaker can play sounds or notpuzzlemaker_publish_dev- compile the current puzzle and publish it to the Steam workshoppuzzlemaker_quitpuzzlemaker_request_publishpuzzlemaker_save_chamberpuzzlemaker_save_dev <name>save the current puzzle as 'name.p2c'puzzlemaker_shadows 0/1- Enable shadows in the Portal 2 Puzzle Makerpuzzlemaker_show_overlay_web_pagepuzzlemaker_show 0/1- 1 shows the puzzle maker, 0 hides itpuzzlemaker_zoom_to_mouse 0/1/2- 0-zoom to center of screen, 1-zoom to mouse cursor (smart), 2-zoom to mouse cursor
Unused content
The following have been found in the game files:
 Aerial Faith Plate (large).
- 'Push out' panel.
- A radial menu with voting criteria for a map, including "confused" and "stuck".
- Various "upgrade" badge textures.
 Crusher
 Portal Spawner
 Unidentifiable panel
- Observation room with adjustable size
- Teapot
Gallery
| Puzzle Creator | |||||||||
| |||||||||
| Pre-release | |||||||||
| |||||||||
References
- ↑ 1.0 1.1 ShackNews article Portal 2 in-game map editor confirmed accessed 22 October 2011
- ↑ Portal 2 - The Final Hours, page 10 of chapter "Unlikely Architects".
- ↑ Portal 2 Puzzle Creator Sneak Peek
- ↑ The Perpetual Testing Initiative
External links
| |||||||||||||


