This [[Test Chamber]] is the seventh level of the game and introduces the player to [[High Energy Pellet]]s, as well as surfaces that are not portal-conductive.
== Contents ==
=== Mechanics ===
* [[Victory Lift]]
* [[High Energy Pellet]] ''(launcher and catcher)''
=== Characters ===
* [[Chell]]
* [[GLaDOS]]
=== Objective ===
* Complete GLaDOS' Test Track (Test Chamber 06)
=== Hazards ===
* [[High Energy Pellet| Getting hit by a High Energy Pellet]]
=== Locations ===
* ''Aperture Science Enrichment Center''
* ''Test Chamber 06 (GLaDOS)''
== Walkthrough ==
{{Spoiler|block=yes|
* Place a portal above the [[High Energy Pellet Catcher]].
* Proceed upon the [[Victory Lift]].
* Proceed into the [[Chamberlock]].
}}
== Video walkthrough ==
{{chamber demonstration}}
== Gallery ==
{{Gallery
|width=192
|height=108
|lines=5
|File:Portal TC 06 - Beta 01.jpg|Pre-release Test Chamber 06
|File:Portal TC 06 - Beta 02.jpg|Ditto
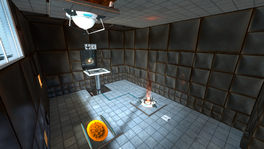
|File:Portal chamber06 01.png|Overview.
|File:Portal chamber06 TransmissionLocation.png|Radio location for the [[Transmission Received]] Achievement.
|File:Portal 2 Chapter 2 Test Chamber 1 Overview Pellet.png|The decayed Test Chamber 06 in ''[[Portal 2]]'', before the High Energy Pellet emitter and catcher are replaced with a [[Thermal Discouragement Beam]] and receptacle.
|File:Portal 2 Chapter 1 Test Chamber 6 first chamber.png|alt1=The decayed Test Chamber 06 in Portal 2|The different and decayed Test Chamber 06 in ''[[Portal 2]]''.
|File:Portal 2 Chapter 1 Test Chamber 6 second chamber.png|alt1=Ditto|Ditto.
}}
{{TestChambersNav}}
[[Category:Portal chambers]]
Latest revision as of 15:13, 17 April 2023
“I can't get over how small you are!” This article is a stub. As such, it is not complete. You can help Portal wiki by expanding it.
Test Chamber 06
testchmb_a_03.bsp
This Test Chamber is the seventh level of the game and introduces the player to High Energy Pellets, as well as surfaces that are not portal-conductive.
The decayed Test Chamber 06 in Portal 2, before the High Energy Pellet emitter and catcher are replaced with a Thermal Discouragement Beam and receptacle.
The different and decayed Test Chamber 06 in Portal 2.