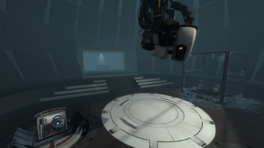
This is the thirty-fifth level of the game and the final part of Chapter 5. It is set within the maintenance areas of the [[Aperture Science]] facility, as well as the [[Central AI Chamber]]. This level does not feature any hazards, and advances the central plot.
== Hazards ==
== Contents ==
===Mechanics===
* Catwalk
* [[Panels]]
* [[Aerial Faith Plate]]
* Stalemate Button
=== Characters ===
* [[Chell]]
* [[Wheatley]]
* [[GLaDOS]]
* [[Defective Turret]]
* [[Announcer]]
=== Objective ===
* Go to GLaDOS' Chamber and confront her
=== Hazards ===
* Deadly Pits
=== Locations ===
* ''GLaDOS' Chamber (clean)''
* ''Core Transfer Area''
== Walkthrough ==
== Walkthrough ==
{{Spoiler|block=yes|
*Go up the stairs and go right. Turn left to the open area.
*Shoot a portal on the panels with the blinking light on the right side.
*Put another portal on the wall of the corridor where you are and go through it.
*Open the door and wait.
*Pick up [[Wheatley]] when possible and plug him into the mainframe.
*Shoot portals to the walls in Stalemate Resolution Annex and the other to the floor in front of the Annex. Go through the portal.
*Shoot a portal to the opposite wall, go through the portal and rush to push the Stalemate Resolution Button.
*Go back to the core transfer bay and wait for the lift and go in it.
}}
== Video walkthrough ==
== Video walkthrough ==
{{walkthrough}}
{{walkthrough}}
== Gallery ==
{{gallery
|File:CoreTransferConcept.jpg|alt1=W|Concept art of the core transfer
|File:GLaDOS' Lair Beta Button.jpg|alt1=W|Pre-Release Screenshot
{{Track|999999}}<br/>{{Track|Dont Do It}}<br/>{{Track|I AM NOT A MORON!}}
<mp3player>File:03-999999.mp3</mp3player>
{{TestChambersNav}}
{{TestChambersNav}}
[[Category:Portal 2 chambers]]
Latest revision as of 09:28, 9 June 2023
“I can't get over how small you are!” This article is a stub. As such, it is not complete. You can help Portal wiki by expanding it.
Portal 2 Chapter 5 GLaDOS' Lair
sp_a2_core.bspCore
This is the thirty-fifth level of the game and the final part of Chapter 5. It is set within the maintenance areas of the Aperture Science facility, as well as the Central AI Chamber. This level does not feature any hazards, and advances the central plot.
9999999 by Aperture Science Psychoacoustics Laboratory [3:11] | Download| Play Don't Do It by Aperture Science Psychoacoustics Laboratory [5:16] | Download| Play I AM NOT A MORON! by Aperture Science Psychoacoustics Laboratory [3:46] | Download| Play