This is the twenty-first level of the game, and is set within a dilapidated Test Chamber. This level features the [[Hard Light Bridge]], and includes [[Goo]] as its primary environmental hazard. The Test Chamber also includes a Rat Man [[Den]]. {{spoiler text|[[Wheatley]] also makes an appearance at the start of the level.}}
*Toxic Water
== Contents ==
=== Mechanics ===
* [[Weighted Storage Cube]]
* [[Heavy Duty Super-Colliding Super Button]]
* [[Vital Apparatus Vent]]
* [[Hard Light Bridge]]
* [[Pedestal Button]]
* [[Panels]]
* Light Strip (white, pink)
=== Characters ===
* [[Chell]]
* [[GLaDOS]]
* [[Wheatley]]
* [[Bird]]
=== Objective ===
* Complete GLaDOS' Test Shaft (Test Chamber 12)
=== Hazards ===
* [[Goo]]
=== Locations ===
* ''Aperture Science Enrichment Center''
* ''Test Chamber 12 (GLaDOS)''
== Walkthrough ==
== Walkthrough ==
{{Spoiler|block=yes|
*Go near the panels on the floor and wait for GLaDOS to talk to the door mainframe.Then go through the door and look at the [[Hard Light Bridge]] on the left.
*Fire a portal above it and the other on the wall in front of you and go through the portal.
*Place the first portal on the end of the Bridge and go through the portal.
*Press the [[Switch]] and look at the falling [[Weighted Storage Cube]]. Fire the second portal on the wall, so it blocks the falling Cubes from falling into the [[Goo]].
*Pick up the Storage Cube and proceed to go through the portal.
*Put a portal on the wall facing the exit-area to get a Bridge there.
*Place the Storage Cube on the [[Heavy Duty Super-Colliding Super Button|button]] and go into the [[Chamberlock]].
}}
== Video walkthrough ==
== Video walkthrough ==
<!--{{youtube||width=640}}-->
{{walkthrough}}
== Easter Eggs ==
*To enter Rat Man's Den, use portals to stand on the light bridge, then look up to the ceiling. There are portal panels through a hole in the ceiling, shoot a portal to those and drop in. Navigate around the air ducts to find Rat Man's den.
== Gallery ==
{{Gallery
|width=192
|height=108
|lines=2
|File:Portal 2 Chapter 3 Test Chamber 12 Wheatley.png|alt1=Wheatley makes an appearance|[[Wheatley]] makes an appearance.
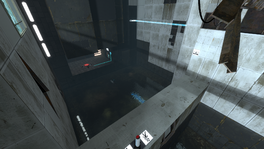
|File:Portal 2 Chapter 3 Test Chamber 12 overview.png|alt1=An overview of the Test Chamber|An overview of the Test Chamber.
|File:Portal 2 Chapter 3 Test Chamber 12 den.png|alt1=A Rat Man den in the Test Chamber|A [[Doug Rattmann|Rat Man]] den in the Test Chamber.
}}
{{TestChambersNav}}
{{TestChambersNav}}
[[Category:Portal_2_chambers]]
Revision as of 18:18, 26 September 2022
“I can't get over how small you are!” This article is a stub. As such, it is not complete. You can help Portal wiki by expanding it.
Portal 2 Chapter 3 Test Chamber 12
sp_a2_bridge_the_gap.bspBridge the Gap
This is the twenty-first level of the game, and is set within a dilapidated Test Chamber. This level features the Hard Light Bridge, and includes Goo as its primary environmental hazard. The Test Chamber also includes a Rat Man Den. Wheatley also makes an appearance at the start of the level.
Go near the panels on the floor and wait for GLaDOS to talk to the door mainframe.Then go through the door and look at the Hard Light Bridge on the left.
Fire a portal above it and the other on the wall in front of you and go through the portal.
Place the first portal on the end of the Bridge and go through the portal.
Press the Switch and look at the falling Weighted Storage Cube. Fire the second portal on the wall, so it blocks the falling Cubes from falling into the Goo.
Pick up the Storage Cube and proceed to go through the portal.
Put a portal on the wall facing the exit-area to get a Bridge there.
To enter Rat Man's Den, use portals to stand on the light bridge, then look up to the ceiling. There are portal panels through a hole in the ceiling, shoot a portal to those and drop in. Navigate around the air ducts to find Rat Man's den.