These Test Chambers form the seventh and eighth levels of the game, and form the final part of the initial phase of testing. Like the other levels in Chapter 1, the levels are set within two dilapidated Test Chambers. {{Spoiler text|The player is not required to complete any additional tests in the two chambers however, as they are reunited with [[Wheatley]] and work with him to proceed to move deeper into the Facility.}}
These Test Chambers form the seventh and eighth levels of the game, and form the final part of the initial phase of testing. Like the other levels in Chapter 1, the levels are set within two dilapidated Test Chambers. The first of the two Chambers corresponds with Test Chamber [[Portal Test Chamber 07|07]] from the original [[Portal]]. {{Spoiler text|The player is not required to complete any additional tests in the two chambers however, as they are reunited with [[Wheatley]] and work with him to proceed to move deeper into the Facility.}}
== Hazards ==
== Hazards ==
Line 44:
Line 44:
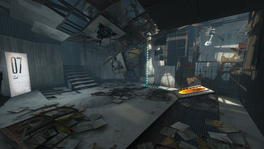
|File:Portal 2 Chapter 1 Test Chambers 7 & 8 reunion.png|alt1=The reunion with Wheatley|The reunion with Wheatley.
|File:Portal 2 Chapter 1 Test Chambers 7 & 8 reunion.png|alt1=The reunion with Wheatley|The reunion with Wheatley.
|File:Portal chamber07 01.png|alt3=Chamber 07|Test Chamber 07 in Portal.
}}
}}
{{TestChambersNav}}
{{TestChambersNav}}
[[Category:Portal 2 chambers]]
[[Category:Portal 2 chambers]]
Revision as of 21:55, 29 August 2011
“I can't get over how small you are!” This article is a stub. As such, it is not complete. You can help Portal wiki by expanding it.
Chapter 1 - Test Chambers 07 & 08
sp_a1_intro7.bsp
These Test Chambers form the seventh and eighth levels of the game, and form the final part of the initial phase of testing. Like the other levels in Chapter 1, the levels are set within two dilapidated Test Chambers. The first of the two Chambers corresponds with Test Chamber 07 from the original Portal. The player is not required to complete any additional tests in the two chambers however, as they are reunited with Wheatley and work with him to proceed to move deeper into the Facility.