{{DISPLAYTITLE:Portal 2 Chapter 1 Test Chambers 7 & 8}}
{{Chamber infobox
{{Chamber infobox
| title = Portal 2 Chapter 1 Test Chamber 7
| title = Portal 2 Chapter 1 Test Chamber 7
Line 11:
Line 11:
| icon1 = cube dispenser
| icon1 = cube dispenser
| icon2 = cube button
| icon2 = cube button
| icon3 = cube hazard
| icon3 = pellet hazard on
| icon4 = player button
| icon4 = pellet catcher on
| icon5 = water hazard
| icon5 = water hazard
| icon6 = fling enter
| icon6 = fling enter
Line 18:
Line 18:
| icon8 = turret hazard
| icon8 = turret hazard
| icon9 = dirty water
| icon9 = dirty water
| icon10 = blades hazard
| icon10 = cake
| previous = Portal 2 Chapter 1 Test Chamber 6
| previous = Portal 2 Chapter 1 Test Chamber 6
}}
}}
Line 24:
Line 24:
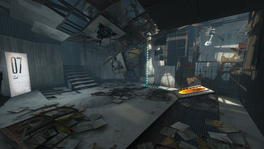
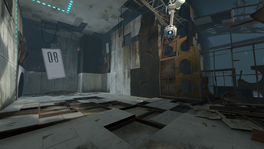
These Test Chambers form the seventh level of the game, and form the final part of the initial phase of testing. Like the other levels in Chapter 1, the level is set within two dilapidated Test Chambers. The first of the two Chambers corresponds with Test Chamber [[Portal Test Chamber 07|07]] from the original ''[[Portal]]''. {{Spoiler text|The player is not required to complete any additional tests in the two chambers however, as they are reunited with [[Wheatley]] and work with him to proceed to move deeper into the facility.}}
These Test Chambers form the seventh level of the game, and form the final part of the initial phase of testing. Like the other levels in Chapter 1, the level is set within two dilapidated Test Chambers. The first of the two Chambers corresponds with Test Chamber [[Portal Test Chamber 07|07]] from the original ''[[Portal]]''. {{Spoiler text|The player is not required to complete any additional tests in the two chambers however, as they are reunited with [[Wheatley]] and work with him to proceed to move deeper into the facility.}}
== Hazards ==
== Contents ==
* None
=== Mechanics ===
* [[Unstationary Scaffold]] (not working ''[missing]'')
* [[High Energy Pellet]] - Launcher & Catcher (not working)
* [[Panels]]
* [[Portal Spawner]]
=== Characters ===
* [[Announcer]]
* [[Chell]]
* [[Wheatley]]
* [[Oracle Turret]]
=== Hazards ===
* [[Goo]] (Not present ''[Missing due to test chamber 08 collided into test chamber 07 after the events of portal]'')
=== Locations ===
* ''Aperture Science Enrichment Center''
* ''Test Chambers 07 & 08 (Dilapidated)''
* ''Dilapidated Facility''
== Walkthrough ==
== Walkthrough ==
{{spoiler|block=yes|
* Drop into the chamber, look to the left and fire a portal into the adjacent chamber.
* Drop into the chamber, look to the left and fire a portal into the adjacent chamber.
* Wait for [[Wheatley]] to detach from his rail, and catch him.
* Wait for [[Wheatley]] to detach from his rail, and catch him.
* Plug Wheatley into the wall socket, follow Wheatley's instructions and wait for him to open the passageway.
* Plug Wheatley into the wall socket, follow Wheatley's instructions and wait for him to open the passageway.
* Follow the walkway to the end of the level, the [[Oracle Turret]] is visible here.
* Follow the walkway to the end of the level; the [[Oracle Turret]] is visible here.
|File:Portal 2 Chapter 1 Test Chambers 7 & 8 reunion.png|alt2={{spoiler|The Oracle Turret}}|{{spoiler|[[Wheatley]] on his Managment Rail on a ruined Test Chamber 08.}}|spoiler2=yes
|File:Portal 2 Chapter 1 Test Chambers 7 & 8 reunion.png|alt2={{spoiler|The Oracle Turret}}|{{spoiler|[[Wheatley]] on his Managment Rail on a ruined Test Chamber 08.}}|spoiler2=yes
|File:Portal 2 Chapter 1 Test Chambers 7 & 8 reunion beta.png|alt2={{spoiler|Pre-release Chamber 08}}|{{spoiler|[[Wheatley]] laying on the floor in a Pre-release Chamber 08.}}|spoiler2=yes
|File:Portal 2 Chapter 1 Test Chambers 7 & 8 reunion beta.png|alt2={{spoiler|Pre-release Chamber 08}}|{{spoiler|[[Wheatley]] laying on the floor in a Pre-release Chamber 08.}}|spoiler2=yes
|File:Portal 2 Chapter 1 Test chambers 7 & 8.png|alt2={{spoiler|The Oracle Turret}}|{{spoiler|[[Wheatley]] on his Managment Rail on a ruined Pre-release Test Chamber 07.}}|spoiler2=yes
|File:Portal 2 Chapter 1 Test chambers 7 & 8 beta.png|alt2={{spoiler|The Oracle Turret}}|{{spoiler|[[Wheatley]] on his Managment Rail on a ruined Pre-release Test Chamber 07.}}|spoiler2=yes
|File:Portal Test Chamber 08.png|alt2={{spoiler|Test Chamber 08 from Portal.}}|{{spoiler|Test Chamber 08 from Portal.}}|spoiler2=yes
}}
}}
{{TestChambersNav}}
{{TestChambersNav}}
[[Category:Portal 2 chambers]]
[[Category:Portal 2 chambers]]
Latest revision as of 22:52, 2 April 2024
“I can't get over how small you are!” This article is a stub. As such, it is not complete. You can help Portal wiki by expanding it.
Portal 2 Chapter 1 Test Chamber 7
sp_a1_intro7.bspSecret Panel
These Test Chambers form the seventh level of the game, and form the final part of the initial phase of testing. Like the other levels in Chapter 1, the level is set within two dilapidated Test Chambers. The first of the two Chambers corresponds with Test Chamber 07 from the original Portal. The player is not required to complete any additional tests in the two chambers however, as they are reunited with Wheatley and work with him to proceed to move deeper into the facility.