Portal 2 Co-op Course 1 Chamber 3: Difference between revisions

From the Portal Wiki
Jump to navigation Jump to search
(Created page with "{{stub}} {{Chamber infobox | title = Co-op Course 1 Chamber 3 | map = mp_coop_laser_2.bsp | number = 03 | total = 06 | screenshot = Portal 2 Co-op...")
 
(Undo revision 183904 by KEMONO PANTSU (talk))
 
(23 intermediate revisions by 12 users not shown)
Line 1: Line 1:
{{stub}}
{{Chamber infobox
{{Chamber infobox
   | title      = Co-op Course 1 Chamber 3
   | title      = Lasers
  | valve-title= 03 Lasers
   | map        = mp_coop_laser_2.bsp
   | map        = mp_coop_laser_2.bsp
   | number    = 03
   | number    = 03
   | total      = 06
   | total      = 06
   | screenshot = Portal 2 Co-op Course 1 Chamber 3
   | screenshot = Portal 2 Co-op Course 1 Chamber 3 overview.jpg
   | icon1      = water hazard
   | icon1      = water hazard
   | icon2      = player button on
   | icon2      = player button on
Line 21: Line 20:
}}
}}


{{TestChambersNav}}
This is the fourth level in Co-op mode of Portal 2 and the third chamber in the course. It introduces players to the use of the [[Thermal Discouragement Beam]]s and [[Discouragement Redirection Cube]]s. [[Turret]]s are present as the primary hazard.
 
== Summary ==
{{Spoiler|block=on|The goal in the first area is to get the beam through each of the nodes. In the second area the beam must be aimed at the panels and by using all four portals direct the beam to the receptacle.}}
 
== Contents ==
=== Mechanics ===
* [[Heavy Duty Super-Colliding Super Button]]
* [[Thermal Discouragement Beam]]
* [[Switch]]
 
=== Hazards ===
* [[Turret]]s
 
== Walkthrough ==
{{Coop walkthrough table
  |  atlas-1 = {{Spoiler|Put your portals on each side of the wall on the left of the node.}}
  |  pbody-1 = {{Spoiler|Put your portals on each side of the wall on the right of the node.}}
  |  atlas-2 = {{Spoiler|Pick up the cube and aim it through every node.}}
  |  both-3 = {{Spoiler|Go in the checkpoint room and then proceed to the next area.}}
  |  atlas-4 = {{Spoiler|Push the [[Switch]] and then go stand on the [[Heavy Duty Super-Colliding Super Button]].}}
  |  pbody-5 = {{Spoiler|Pick up the Cube and redirect the beam from the ceiling to the turrets in order to destroy them. Then aim the beam straight forward to the white panels.}}
  |  atlas-6 = {{Spoiler|Shoot your portals to the panels with the beam and the other portal on the wall nearest to the node.}}
  |  pbody-6 = {{Spoiler|Place your portals on the highest panels and then to the panels near the place where you picked up the Cube.}}
  |  both-7 = {{Spoiler|Go to the door and then proceed to the disassembly area.}}
}}
 
== Video walkthrough ==
{{walkthrough | nodemo = true}}
 
== Gallery ==
{{Gallery
|width=192
|height=108
|lines=2
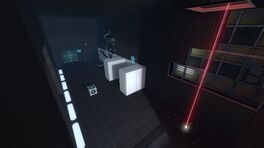
|File:Portal 2 Co-op Course 1 Chamber 3 area 2.png|alt2=The second area of the chamber.|The second area of the chamber.
}}
 
== Related achievements ==
{{Show achievement|Portal 2|Team Building}}
 
[[Category:Portal 2 Co-op chambers]]
{{stub}}

Latest revision as of 04:54, 13 June 2023

Lasers
mp_coop_laser_2.bsp 03 Lasers

Chamber number 0.pngChamber number 3.png


Test Chamber Infobox previous.png
Test Chamber Infobox next.png
Test Chamber Infobox Portal Guy.png
Chamber progress 0.pngChamber progress 3.pngChamber progress slash.pngChamber progress 0.pngChamber progress 6.png


Portal 2 Co-op Course 1 Chamber 3 overview.jpg
Chamber icon water hazard.pngChamber icon player button on.pngChamber icon cube button.pngChamber icon cube hazard.pngChamber icon pass cube.png
Chamber icon turret hazard on.pngChamber icon laser hazard on.pngChamber icon laser redirection on.pngChamber icon crusher hazard.pngChamber icon dirty water.png

This is the fourth level in Co-op mode of Portal 2 and the third chamber in the course. It introduces players to the use of the Thermal Discouragement Beams and Discouragement Redirection Cubes. Turrets are present as the primary hazard.

Summary

The goal in the first area is to get the beam through each of the nodes. In the second area the beam must be aimed at the panels and by using all four portals direct the beam to the receptacle.

Contents

Mechanics

Hazards

Walkthrough

# Atlas P-body
1Put your portals on each side of the wall on the left of the node.Put your portals on each side of the wall on the right of the node.
2Pick up the cube and aim it through every node.
3Go in the checkpoint room and then proceed to the next area.
4Push the Switch and then go stand on the Heavy Duty Super-Colliding Super Button.
5Pick up the Cube and redirect the beam from the ceiling to the turrets in order to destroy them. Then aim the beam straight forward to the white panels.
6Shoot your portals to the panels with the beam and the other portal on the wall nearest to the node.Place your portals on the highest panels and then to the panels near the place where you picked up the Cube.
7Go to the door and then proceed to the disassembly area.

Video walkthrough

Gallery

Related achievements

Team Building
Team Building
Complete all test chambers in the Team Building co-op course