Cooperative Testing Initiative/Course 1: Team Building/Course 1: Mobility Gels/02 Buttons: Difference between revisions
Jump to navigation
Jump to search


mNo edit summary |
m (Reverting vandalism) |
||
| (35 intermediate revisions by 6 users not shown) | |||
| Line 1: | Line 1: | ||
{{Chamber infobox | {{Chamber infobox | ||
| title = | | title = Buttons | ||
| valve-title= | | valve-title= Buttons | ||
| map = mp_coop_race_2.bsp | | map = mp_coop_race_2.bsp | ||
| number = 02 | | number = 02 | ||
| total = 06 | | total = 06 | ||
| screenshot = Portal 2 Co-op Course 1 Chamber 2 overview. | | screenshot = Portal 2 Co-op Course 1 Chamber 2 overview.jpg | ||
| icon1 = water hazard on | | icon1 = water hazard on | ||
| icon2 = player button | | icon2 = player button | ||
| icon3 = cube button on | | icon3 = cube button on | ||
| icon4 = cube hazard | | icon4 = cube hazard | ||
| icon5 = | | icon5 = cube dispenser | ||
| icon6 = turret hazard | | icon6 = turret hazard | ||
| icon7 = laser hazard | | icon7 = laser hazard | ||
| icon8 = laser redirection | | icon8 = laser redirection | ||
| icon9 = crusher hazard | | icon9 = crusher hazard | ||
| icon10 = dirty water | | icon10 = dirty water | ||
| previous = Portal 2 Co-op Course 1 Chamber 1 | | previous = Portal 2 Co-op Course 1 Chamber 1 | ||
| next = Portal 2 Co-op Course 1 Chamber 3 | | next = Portal 2 Co-op Course 1 Chamber 3 | ||
}} | }} | ||
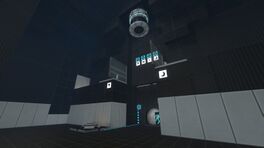
This is the second co-op chamber in the game, and it introduces players to the use of the [[Edgeless Safety Cube]]. [[ | This is the second co-op chamber in the game, and it introduces players to the use of the [[Edgeless Safety Cube]]. | ||
Most beginners (or players who made a [[Cooperative_Testing_Initiative#Reset_progress|reset]] recently) get there from the [[Portal 2 Co-op Course 1 Chamber 1|01 ''Doors'', Course 1: ''Team Building'']]. Players can get there from the [[Hub]] when at least one player unlocked the 02 ''Buttons''... | |||
{{Spoiler|block=on|The goal in the first area is to get through the other side of the room which is separated by goo. There is a switch to operate the door on the other side. In the other room there are 4 switches and multiple portal surfaces.}} | {{Spoiler|block=on|The goal in the first area is to get through the other side of the room which is separated by goo. There is a switch to operate the door on the other side. In the other room there are 4 switches and multiple portal surfaces.}} | ||
== | == Mechanics == | ||
* [[Portal]]ble surfaces...{{Explain}} | |||
* [[ | * 5 [[Pedestal Button]]s | ||
* 1 non-static and timed [[panel]] | |||
* 1 timed [[Vital Apparatus Vent]] | |||
* 1 [[Edgeless Safety Cube]] | |||
* 1 [[Edgeless Safety Cube Receptacle]] | |||
== Hazards == | |||
* [[Goo]] | * [[Goo]] | ||
{{clear}} | |||
== Walkthrough == | == Walkthrough == | ||
=== Naive === | |||
{{walkthrough | nodemo = true}} | |||
{{Coop walkthrough table | {{Coop walkthrough table | ||
| atlas-1 = {{Spoiler|Enter the chamber and go stand by the button.}} | | atlas-1 = {{Spoiler|Enter the chamber and go stand by the button.}} | ||
| Line 45: | Line 50: | ||
| both-8 = {{Spoiler|Place the ball to the receptacle.}} | | both-8 = {{Spoiler|Place the ball to the receptacle.}} | ||
}} | }} | ||
=== Speedrunning === | |||
==== Best time ==== | |||
==== Fewest portals ==== | |||
== | == Notes == | ||
{{ | {{Spoiler|block=on| | ||
* Players can keep the [[panel]] open by repeatedly pressing the [[Pedestal Button]]. }} | |||
== Gallery == | == Gallery == | ||
{{Spoiler| | |||
{{Gallery | {{Gallery | ||
|width=192 | |width=192 | ||
|height=108 | |height=108 | ||
|lines=2 | |lines=2 | ||
|File:Portal 2 Co-op Course 1 Chamber 2 Area 1.png|alt1=The first area of the chamber.| | |File:mp_coop_race_20036.jpg|alt3=| | ||
|File:Portal 2 Co-op Course 1 Chamber 2 Area 2.png|alt2=The second area of the chamber.| | |File:Portal 2 Co-op Course 1 Chamber 2 Area 1.png|alt1=The first area of the chamber.|1st area of the chamber. | ||
|File:Portal 2 Co-op Course 1 Chamber 2 Area 2.png|alt2=The second area of the chamber.|2nd area of the chamber. | |||
}} | |||
|block=yes | |||
}} | |||
== Achievements == | |||
=== Team Building === | |||
{{Show achievement|Portal 2|Team Building|story-related|self-explanatory. | |||
}} | }} | ||
{{Needimage}} | |||
{{ | {{cleanup|reason=1. use [[Portal Wiki:Help:Walkthrough table]].<br />2. Fix YouTube embeds.}} | ||
[[Category:Portal 2 Co-op chambers]] | [[Category:Portal 2 Co-op chambers]] | ||
Latest revision as of 04:55, 13 June 2023
Buttons
mp_coop_race_2.bsp Buttons

This is the second co-op chamber in the game, and it introduces players to the use of the Edgeless Safety Cube.
Most beginners (or players who made a reset recently) get there from the 01 Doors, Course 1: Team Building. Players can get there from the Hub when at least one player unlocked the 02 Buttons...
The goal in the first area is to get through the other side of the room which is separated by goo. There is a switch to operate the door on the other side. In the other room there are 4 switches and multiple portal surfaces.
Mechanics
- Portalble surfaces...[explanation needed]
- 5 Pedestal Buttons
- 1 non-static and timed panel
- 1 timed Vital Apparatus Vent
- 1 Edgeless Safety Cube
- 1 Edgeless Safety Cube Receptacle
Hazards
Walkthrough
Naive
Provided ID could not be validated.
| # | Atlas | P-body |
|---|---|---|
| 1 | Enter the chamber and go stand by the button. | Place your portal on the panels ahead and the other portal on the other side of the room. Go through the portal and stand by the blue squares on the wall. |
| 2 | Press the button. | |
| 3 | Go through the opened panels. Place the same portal you just came out of to the portal surface on this side of the room. | |
| 4 | Walk through the portal. | |
| 5 | Go to the small room ahead and wait for the door to open. | |
| 6 | Shoot a portal on the highest white panels on your side and go stand by the switch on your side. Place a portal next to you and wait until your friend is ready. | |
| 7 | Use the Timer Ping and press the switch when the count is over. Then head for the second switch through your portal and press it. | |
| 8 | Place the ball to the receptacle. | |
Speedrunning
Best time
Fewest portals
Notes
- Players can keep the panel open by repeatedly pressing the Pedestal Button.
Gallery
|


Achievements
Team Building
 |
Team Building Complete all test chambers in the Team Building co-op course Difficulty: story-related How to obtain: self-explanatory. |
 | “Nope, still can't see!” This page would benefit from the addition of one or more images. Please add a suitable image, then remove this notice. |
 | “You just have to look at things objectively, see what you don't need anymore, and trim out the fat.” This page has been marked for general cleanup. Reason: 1. use Portal Wiki:Help:Walkthrough table. 2. Fix YouTube embeds. Please see Portal Wiki style guide for information on how to improve this article. |