This is the fourteenth level of the game, and takes place within a dilapidated Test Chamber. This level continues to use the [[Thermal Discouragement Beam]] as its primary [[mechanic]], and demonstrates the way in which interrupting the Discouragement Beam can be used to the player's advantage. The Test Chamber also introduces the [[Unstationary Scaffold]], and Goo is present as the primary environmental hazard.
*Once inside the test chamber, look straight ahead to find a [[Switch|switch]] against a wall. Place a portal on the wall to the immediate left, and the opposite portal on the wall near the switch.
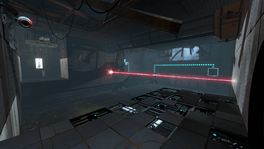
*Place a portal on the wall where the [[Thermal Discouragement Beam]] makes contact. Ensure that this portal is opposite to the colour placed on the wall to the left of the chamber entrance. If done correctly, the beam will make contact with the receptacle, and the [[Unstationary Scaffold]] will move towards the platform with the button.
*Once on the platform, use the cube to block the beam temprarily in order to manouver around it. Once on the other side, pick up the cube once more, and place it on the [[Heavy Duty Super-Colliding Super Button]] to open the door to the [[Chamberlock]]
4. 平台抵達時,登上平台。經過高溫鎮暴雷射時使用方塊阻擋其光束(此時平台會停止移動),繞過光束後再讓它連接接收器,使平台可以繼續前往出口。平台到達出口的那一邊之後,將方塊放在[[Heavy Duty Super-Colliding Super Button/zh-hant|超大型撞擊按鈕]]開啟出口門。前往[[Chamberlock/zh-hant|測驗室電梯]]。<br>
}}
}}
Line 45:
Line 45:
|height=108
|height=108
|lines=2
|lines=2
|File:Portal 2 TC 04- Beta 01.png| Earliest known version of Test Chamber 4
|File:Portal 2 TC 04- Beta 01.png| 已知的測驗室 4 的早期版本
|File:Portal 2 Chapter 2 Test Chamber 4 overview.png|alt1=An overview of the Test Chamber|An overview of the Test Chamber
|File:Portal 2 Chapter 2 Test Chamber 4 overview.png|alt1=測驗室的概貌|測驗室的概貌